Excited about the new Rawlands rSogn

Size M/L rSogn. Photo borrowed from the Rawland Cycles blog.

I was going to wait until the bike was finalized to post this, but I think it is getting close enough. You can read all about the planned rSogn on the Rawland Cycles Blog.

Rawland Cycles is updating the Sogn. The Sogn was already a nice bike, but the revisions are just going to make it better. The new bike will have the same tire clearance (58mm knobbies fit) and offroad friendly sloping top tube of the original, but gets lighter tubing and a geometry that is friendly to front loads while still working well unloaded offroad.

This almost makes it a mass produced variation of Gifford, the bicycle that I built in my basement and posted about in painful detail on this blog.  The tubing specs are the same.  The geometry is basically the same.  The construction methods and some details (fork bend, bottom bracket style, braze-ons) are different.

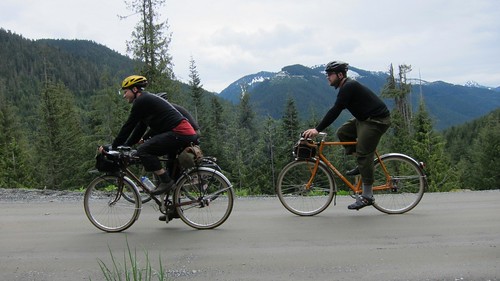
I’ve spent far too much time thinking about this style of bicycle. I don’t have a good name for it, but let’s call it a Rough Stuff bike. It is great on pavement with fenders and a commuting or light touring load. It is great on dirt roads. It is good on singletrack. It is the Subaru WRX of bikes: doesn’t look like anything special, but performs well on pavement and on dirt, and at the end of the day it can carry your groceries home too.  I’ve built 7 of them using a variety of frames in the last decade, and Gifford is the best of them by far.

Sean (the owner of Rawland Cycles) is running the design process well.  I was worried at first that this bike could end up with the “design by committee” failing of some other projects.  That usually produces a mess, where the final bike doesn’t follow any single vision and tries to make everyone happy.  Sean is being good at both listening to input and making tweaks here and there, but keeping his vision of what he wants to build and making sure that the bike meets his vision of how it should be ridden.  He’s had to make some decisions that might cost him a sale or two (cantilever brakes instead of disk brakes), but I think that is better than putting on mounts for both.  The Simpsons had a classic episode about this problem, where Homer ended up building this:

"The Homer".  A nightmare of designed by committee, even though in this case the committee was just Homer.  Photo borrowed from Wikipedia.

$500 (introductory price) is very nice for the frame and fork.  I’m probably buying one, even though it goes against my current plan of getting rid of bikes (at the moment I’m being too effective at that, I only have 2 rideable singles…Gifford and my MTB).

Disclaimer: I’ve been emailing Sean and providing my input on the bike, but get no kickback for this posting or my input.  I just want to see him sell a bunch of them because it is going to be a great bike.

Back to the CdA National Forest

John, Pat, and I had such a good time in the Coeur d’ Alene National Forest in June that we decided to go back this September.  Andre was interested and came along.  To fit the trip into a 3 day weekend Andre and I flew out from Seattle and borrow bikes from John and Pat.  We flew in Thursday night, drove out to the base camp, did a long ride on well established roads on Friday and a short ride exploring side trails on Saturday.  Saturday night Andre and I flew back to Seattle.

Our last trip turned from car camping into bike camping from a conversation that went something like this:

John: How far will we be from the car at the end of the day?
Alex: About 5 miles?
John: Why am I carrying all of this camping gear?  Let’s just ride back here.

This time we didn’t even kid ourselves with bike camping and went whole hog with the car camping.  John and Pat brought along a lot of food for us, two big stoves, a folding table, a pop-up shelter, 4 tents, more sleeping bags that you could imagine, and tons of other gear.  Andre and I just had to bring a little clothing, snacks for the day, and sleeping bags.

Thursday was chilly but it didn’t rain on us.  The first half of the ride used a route that Pat came up with, and took us to the same lunch spot at Magee Ranger Station that we visited before.  We started climbing immediately, but the first half of the climb was a good warm up with about 1000′ gained at 5-7% grade.  The second half was probably twice as steep on and worse condition roads.  The descent into Magee started a bit bumpy, but then we found some nice roads that were great to roll down.

The weather was colder than any of us had expected, but luckily not colder than what we had planned for.  At every stop it seemed like we were adding or removing jackets to keep comfortable. 

After lunch we had planned to follow our June route up to Spyglass Peak.  I was worried about getting that high in elevation and suggested my “wuss route” option.  It looked roughly the same length, but I thought it would keep us 1000′ lower in elevation.  I didn’t check any topo maps to figure that out though, so it ended up having just as much climbing.  It had good views though, and the descent ended about 2 miles from our campsite and kept us off of the only “busy” (meaning 2 cars an hour) road in the whole national forest.

On Saturday we went up what we call “John’s climb”.  We drove out on this road in June and John kept commenting on how nice of a climb it appeared to be.  This time we found it freshly graded and were enjoying the climb up.  Maybe 1/4 of the way up there was an interesting looking spur, so we followed that.  It was gated closed and isn’t used in the summer (only for snowmobiles in the winter), so it was quite grown over and involved some hike a bike.  We found an old building foundation, a tiny dam that must have been used to provide water for the building, and some good riding and hike a bike.  From there we followed a maze of closed roads (some with dead ends) back to camp.  The ride was probably less then 10 miles long, but the slower pace and interesting conditions were a nice change from Friday.

Thanks to John and Pat for loaning Andre and I gear and feeding us like kings.  Andre and I were brainstorming on where we’d take them for similar riding near Seattle and came up empty.  Spokane is lucky to have such a huge and little used national forest just a bit over an hour from downtown.  I’m guessing I’ll visit it again at least once next summer.

Friday’s Route: http://phred.org/~alex/maps/CDA-Friday-Sept-2010/ or GPX
Saturday’s Route: http://phred.org/~alex/maps/CDA-Saturday-Sept-2010/ or GPX

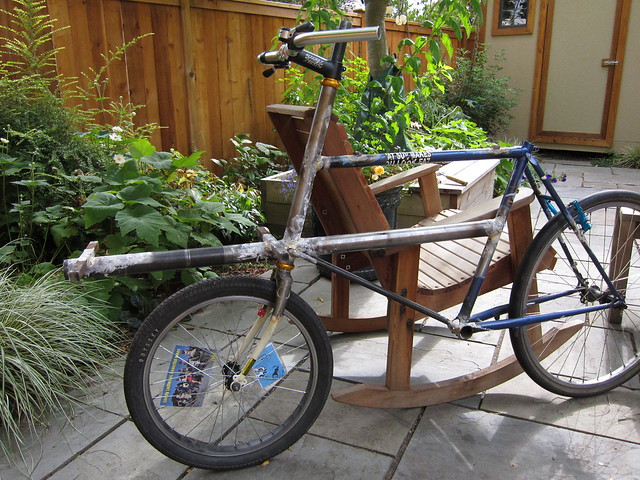
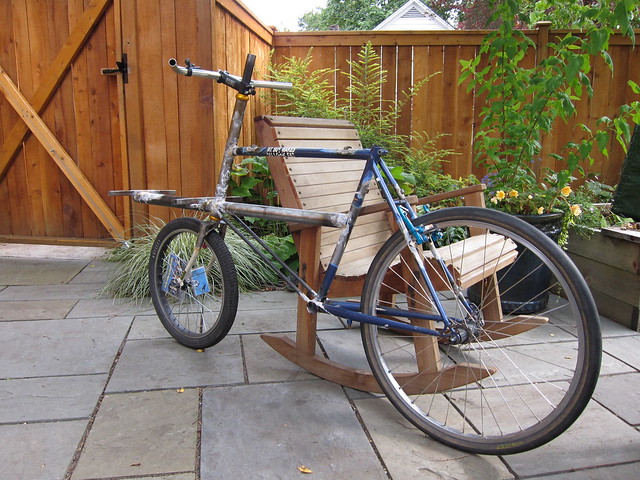
Progress on Rory’s Cycletruck (aka the Cargo Turd)


Rory and I started working on this bike quite a while ago, then took the summer off (summers are for riding, not workshop time).  This weekend the weather wasn’t great and I had to stick around home, so we got some time to put the finishing shop time on it. 

The donor frame is John Speare’s “Fuji Turd”.  As with my cycle truck conversion the rear triangle and top tube remain, the downtube and cargo tube were added.  This bike has a little slacker head tube with a bit more offset to get the front wheel a little more under the load. 

Rory got creative and used twin tubes 1/2″ tubes for the downtube rather than a traditional one.  It sure was easier to miter, and it should be strong enough since the cargo tube is also supporting the seat tube.  Other important weight saving features are a custom “80/50/80″ (in thousanths) external butted cargo tube, a similarily butted head tube and a big hole in the bb shell where the original downtube used to be.

Rory did all of the brazing on the frame.  He’s built a few racks, but this is his first project with larger joints.  That thick cargo tube and head tube took some real heat, but the brass penetration is good and a test joint came out well.  A more experienced friend helped him with the fork.  I helped him a lot with the mitering, fixturing, and lathe work.

Double butting the cargo tube:

Yes, that is a big hole in the bottom bracket.  This shot is from adding the mixte-style downtubes:

A very nice fork, and a temporary front wheel:

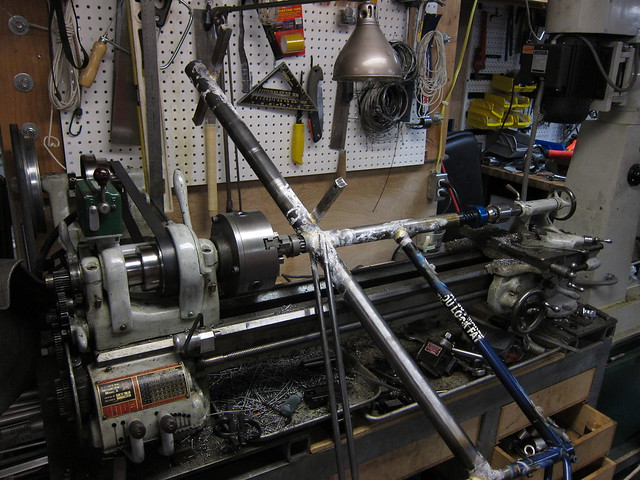
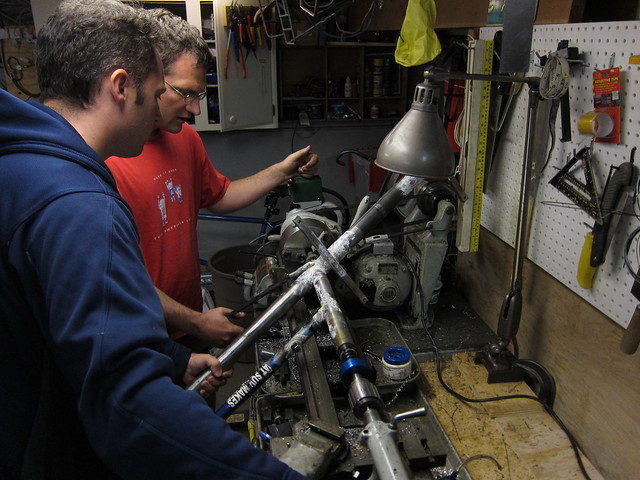
That really long head tube was a challenge.  I made tooling to hold my Park head tube reamer and facing tools on the lathe.  The regular Park holder is really only designed for head tubes up to 10″ or so in length, this one is almost 2 feet.  My lathe has a 36″ working distance between the headstock and tailstock.  We ran it at a very low 40rpm, with me operating the headstock and Rory holding the frame and adjusting the tailstock to get the right preload on the tension spring.  It worked nicely.  When I get a chance I’ll take photos of just that tooling and link to them in a comment on this entry.

Setup for facing the bottom of the head tube:

I’m controlling the power, Rory is holding the frame and controlling the tension of the tailstock spring:

Tomorrow is the Labor Day Cargo Bike Ride in Seattle.  Rory is hoping to have the bike in a rideable condition by then.  A drum brake hub for the front wheel is on it’s way, so the bike will just have a rear brake for the time being.  As with all experiments it will probably be ridden quite a while before we add finishing touches and get it powder coated.

Blog Conversion

I’ve switched my blog from running CommunityServer (which went from bad to worse) to Wordpress (which seems to be pretty good, and is certainly popular).

This shouldn’t mean too much for the average reader. I think I’ve properly setup the feeds so that anyone who subscribed to the old blog will start to see posts on the new blog. The old URL of http://blogs.phred.org still works, but the preferred URL is now http://alexwetmore.org.

The only new content since Jan is a trip report from our paddle around the Broken Group Islands. I’ve been busy enjoying the summer and staying busy at work, so the blog has been pretty quiet. Expect the normal busy basement content to start again in October when the days are shorter, cooler, and rainier. I hope everyone else is also having a good summer.

Kayaking the Broken Group Islands

Christine and I spent 5 days of our summer vacation kayaking camping in the Broken Group Islands, off of the west coast of Vancouver Island in British Columbia.

The Broken Group is an archipelago of more than 100 small islands inside Barkley Sound. 8 of them have camping, and the camping is only open to paddlers (no motor boats or sailboats). The islands do a good job of buffering the Pacific Ocean, so the paddling is mostly very calm and flat. The whole area is preserved as a national park, so there is a lot of wildlife and little in the way of buildings. At the same time it was once a very vibrant area of villages for the First Nations people of BC, and there are a lot of artifacts to be found from that time.

We used the guidebook Kayaking the Broken Group Islands: The Essential Guidebook to plan our trip. I think everyone that we met there was using this book. It was a good resource and had details about each of the islands and what to look for on them.

On our first day we parked our car at Toquart Bay and took the water taxi from there to Sechart. This saved us an open crossing (one that we’d have to do later in the trip) and let us get a head start into the islands. Sechart is also the only source of fresh water near the Broken Group, and where most people who are renting kayaks start their trip.

On that first day we explored the inner islands that are closer to Sechart. I was really interested in visiting a large lagoon between Jacques and Jarvis Islands. There are four entrances to the lagoon and we came in through one of the largest ones. The lagoon was very calm since it is protected almost all the way around, and we watched the birds and enjoyed checking out the tidepools. On our way out we took a very narrow passage that Christine was convinced didn’t really exist until we had passed through. I love being able to slip through those narrow passages on a kayak.

On our way out we made a decision to go to Dodd or Willis Island for the night instead of Gibraltar. I had planned on avoiding Dodd and Willis because our guidebook said that they were the busiest islands and popular with guided trips. On the other hand they were well located to set us up for a short day getting to Clarke Island (where we wanted to stay for a couple of nights), and the ranger had told us that the islands weren’t too busy. As we paddled past Dodd we thought we saw about10 campers and maybe should check out Willis. While padding the channel between Dodd and Willis we saw our first whale of the trip, what looked like a humpback off in the distance by the north end of Willis. We hurried over to get a second look, but didn’t see it surface again. We found the campsite on Willis and were initially disappointed by the crowds (about 30 people were there, including two large groups),but found a quiet but compact site with our own little patch of the beach. The couple near us was kind enough to share their beach fire too.

This was an important lesson in camping in the Broken Group. The campsites are close together and you don’t really get much privacy there. On the other hand the other people paddling the Broken Group are from all over the world and are full of interesting stories,so by the end of our trip we were enjoying finding other people. Just don’t go to the Broken Group if you want to camp by yourself.

The fog really moved in quickly that night, and by the time we were eating dinner you could barely see a little island just off of the campsite.

The next morning we got up pretty early and made a fast trip paddle down to Clarke Island. I think our favorite part of that paddle also turned into the most frustrating. We were paddling through a small channel between Turret and Trickett Islands that is beach at low tide and has water at high tide. We both really enjoy paddling in 6 inches of clear water and looking down at the intertidal life. Having a white sand beach below really made the sea stars, crabs, and other creatures in this area pop with color. We floated around there for 30 minutes or more. The bad part was that just as we were thinking about heading on I reached into my bag for the binoculars and heard the plop of something else falling into the water. I didn’t think anything was missing, but 20 minutes later discovered that we had lost our VHF emergency radio. I went back and looked all over for it, but it was gone.

We got to Clarke Island pretty early in the day and found a great campsite out on a point. We setup the tent on a grassy bluff above the point, but there was a great shared fire pit down in the sand, and a nice table made up with driftwood right in front of our site. The sun was out so Christine decided to enjoy some sunny beach time and I took my kayak out to the water to paddle around and practice rolling my kayak. A few hours later we took an impromptu paddle around Clarke Island and loved the scenic beaches on the west and south sides of the island. We also saw our second whale of the trip, a humpback that was closer in to us and just north of Clarke Island.

In the evening we shared the campfire with our neighbors and shared a lot of good stories and laughs. A great part about the Broken Group was having a lot of privacy during the day when out on the boat, but getting to know people in the evenings.

We had decided to stay for 2 nights on Clarke Island, which made our next morning very relaxed. Christine slept in, and then we had a leisurely breakfast before heading out on a day paddle. Our goal was to go to Wouwer Island and find the sea lions that we would occasionally hear. I was worried about the crossing over to there because it is a bit more exposed, but the seas were pretty calm and it went quickly. Wouwer did deliver and we found some rocks that were covered in Stellar Sea Lions.

We paddled around to the other side of the island hoping to get into a giant lagoon called “The Great Tidepool”, but the tide was too low and there wasn’t any good access. However we did find this sea lion who was looking calm and happy.

On the paddle back some small Dolphin entertained us during the open water crossing to Benson Island. We stopped thereto collect driftwood for the campfire. Some neighbor’s on Clarke told us that this was a good source of firewood, and they were right. There were plenty of pieces that were small enough to burn safely and dry from sitting high on the beach. That night Clarke Island was quite a bit emptier, with only a few groups camping. We had a large dinner and enjoyed a good fire, while getting to bed early.

We had a long paddle planned for the next day and got up pretty early to get started. We were planning on going to Hand Island, about 8 miles away, and camping there. Hand is always busy because it is the gateway island in and out of the Broken Group (going to Toquart Bay, where we had parked), and most people stay there on their first and last nights. The paddle to Hand mostly covered areas that we had already paddled and went pretty quickly. It was a really foggy day which made it a bit difficult to get motiviated, and we had both made the mistake of skipping breakfast to optimize our use of the tide. We got to Hand around noon, but hungry and ready for a pot of coffee.

Hand was a disappointment. We didn’t really like the campsites and there was a motor boat illegally camping there. During our meal we decided that maybe we should press on and camp at the Stopper Islands instead. After lunch we did enjoy the shallow waters that were full of bat stars and other sea stars just north of Hand Island.

The paddle over to the Stopper Islands goes on another exposed area called the Davis Channel. It was a little rougher during our crossing and there weren’t really any good beaches to pull over and take a break on. We were happy and tired when we got to the Stopper Islands.

On the South Stopper Island we found a very nice couple named Peter and Linda who were having a cup of tea. They invited us to join them and I think it was really a highlight of the trip for both Christine and I. Peter and Linda had lived all over the world (just in the last 10 years they had lived in Greece, England, and BC) and had been living and working on sailboats most of their lives. They recently decided to move to a house and had settled in BC. They sold their sailboat, but couldn’t give up the water, and in retirement were enjoying day paddles in a pair of kayaks. They both had a great sense of humor and tea lasted for a couple of hours of really fine conversation. It was a great way to finish off an otherwise ho-hum day.

The campsite where we had tea was a bit exposed and windy, so we decided to check out the one on the other side of the island. I’m really glad that we did, it was beautiful. There wasa rocky beach (it was nice to get away from the sand for a little bit) and two large clearings in the woods. One had a good firepit, and the other was great for our tent. We setup kitchen near the firepit, ate a feast of a meal, and played a game of hide the food with the resident mouse who was determined (but unsuccessful) to share in our dinner. I think most people pass through the Stopper Islands, but I have to say that it was one of our favorite campsites. Peter and Linda had been exploring this area of the sound quite a bit on their day paddles and had a lot of good things to say. I could see spending more time in this region on a future trip.

We woke up on our final morning to a steady rain. We hadn’t really planned on this the evening prior, but luckily everything important was properly stored and covered. We had another quick morning of loading up the boats and a short 2 mile paddle back to Toquart Bay, where we finished our trip.

Planning: Seatrails makes a great kayaking chart of the area. It shows the distances popular points and it is easier to read than the official chart that the Canadian gov’t publishes. The guidebook listed above was really helpful. One tricky thing is that you need to bring all of your own water, we brought 10 gallons of fresh water but only used about half of that by being careful when doing dishes.

It does take a long time to get there from Seattle, despite being fairly close geographically. Figure 8 hours of driving. We broke it up a bit by staying at a motel in Port Alberni the night before starting our paddling trip.

We spent 4 nights there, and I think that is a good amount of time. On the other hand I could easily see spending 8 nights there and not getting bored. With some of that extra time I’d have explored the Pipestream Inlet and other areas around Toquart Bay.

Regrets: I wish I had taken more photos, especially of the human companions that made our trip so great. I also need to come up with a better system for carrying and using the camera on the kayak.

We stayed for 4 nights in Tofino at the end of our trip, and that was too long. The paddling up there is great, but otherwise it was an expensive touristy beach town. We rented from Tofino Vacation Rentals and I would not rent from them again, our house was poorly equipped and was missing wifi, despite having had advertised that it came with it.


Coeur d' Alene National Forest


(photos just in case you don’t have flash)
John, Larry, and I all wanted to get in a good ride this summer, but didn’t have a week to dedicate to something like our 2007 Gifford Pinchot tour. We decided that a long weekend ride would be a good idea. We always make John come west, so this time we headed east and picked the CdA National Forest as our target. John invited Pat along too, bringing the group size to 4.
Way back in March or April we got a personal guarantee of good weather from John with our mid-June riding date. Last week it became obvious that this wasn’t going to happen and that rain was likely. The rain changed our parking location from being the corner of the forest to one of the central campgrounds. That made our first evening’s ride to our campsite much shorter.
map

On Friday morning we woke up to light rain, but as we ate lunch it began to clear and dry out. When I told John that we’d be ending the day about 5 miles from the car again he asked about just ditching the camping gear and turning it into a slightly longer day ride. That seemed like a good idea, so we rode back to the car, ditched gear,and started the loop.

We started near Huckleberry Campground right in the middle of the CdA National Forest. Pat really liked how Spyglass Peak looked on the map,so we concentrated on that part of the original route. The highlight there was a short but steep climb (seen on the map above between miles 25 and 30) followed by a long ridgeline descent.

Getting to Spyglass Peak meant riding to Magee first. The route to Magee is over an easy saddle (Leiberg Saddle) followed by a really nice descent through Tepee Creek and the meadows along it. This creek runs through a narrow valley with a wide meadow that must flood every year. The road is above the meadow and creek, giving you very nice views into the area below. It really reminded me of areas of Yellowstone National Park,only this valley wasn’t overrun with tourists.

We reached Magee around lunch time. Magee consists of 4 historic buildings and a backcountry airport where a ranger office used to be. We enjoyed a nice lunch there before heading uphill towards Spyglass Peak. The climb up towards Spyglass was almost perfect and a marvel of good surveying. It was steep,but not too steep (around 9% grade). The gradient was consistent and the road conditions were excellent. We saw a few moose on the way up. At the top we got to a ridgeline with good views in all directions.

The descent down the ridgeline was fun. The descent was a much lighter grade and just felt like it went on forever (if you look on the map above it looks like we were descending for about 20 miles before the next major climb). Once in a while there would be a half mile climb or so to get some more altitude. Since we were riding along the ridgeline we’d get views to the east, then cross over and get some views to the west. The weather was dynamic up there with areas of rain, sun, and sometimes both at once. The roads were a little damp (good for keeping the dust down) and had no washboard. It really made for some fun riding.

CdA National Forest is a maze. Every few miles we’d come to a N-way intersection and have to figure out our next turn. At Stull Saddle we ran into one thing that really threw us off. Pat looked at his paper map and said “we want to take 812 back to Leiberg Creek”. I looked at my GPS and said “I drew out this red line that we should follow”. It looked like the line might also follow 812, so we trusted Pat’s map and headed down 812. A mile or so down I kept slowing down and looking at the GPS and John asked me what was wrong. We weren’t on the red line, but I decided to trust the map more than the line.

We knew that we made a wrong turn when we got to a sign that said “Magee, 3 miles”. Oops! We turned uphill and did the climb up to Leiberg saddle again. There we found 260 which connected back to Stull Saddle. On the descent down from Leiberg Saddle we found the other 812. That mistake cost us 10+ miles, but they were enjoyable. If you go to the CdA National Forest I’d bring a GPS and the forest map, and still give yourself a little time to get lost.

The road back to our campsite seemed a lot longer on the way out than the way in. We made it back to our car and the camp area around 7pm, 10 hours or so after we left. A good long day on the road: roughly 65 miles and somewhere between 7,500 feet and 11,000 feet of climbing depending on which mapping software you trust. I think the 7,500 number is probably about right.

Saturday morning on the drive out we took some other very minor roads and saw more areas which are ripe for exploring. I really get the impression that you could park somewhere central and setup a base camp and find a new excellent loop every day for a week without duplicating much scenery. That would all be while staying on the labeled roads and ignoring the dozens of unmarked side roads and singletrack that we saw on our route. We made future plans to do exactly that. John and Pat are very lucky to have all of this great riding only a bit over an hour away.

Appendix A: Water Filters
This what water filtering looked like for us in 2007:

Roughly 3 minutes of annoying pumping for every 1 liter of water that you want.

This is what it looks like now:


30 seconds of going by the river to fill a bladder full of water. 5 minutes of waiting for gravity to do it’s work and filter 4 liters of water for you, during which time you can eat lunch, chat, or just enjoy the sun. It is a huge improvement. We brought along MSR and Platypus gravity water filters. Both use the same filter cartridge and technology. The MSR one has a nicer “dirty water” bladder, but doesn’t come with a “clean water” bladder (so it is $20 more expensive once you buy one of those). Either option is great.

Appendix B: CdA vs Gifford Pinchot

Gifford Pinchot has better scenery. We didn’t see anything like this, this, or this in CdA. The volcanic backdrop of Gifford Pinchot just adds more dynamic scenery to the picture.

Gifford Pinchot has more pavement.

CdA has more roads. It is a real maze in there, and you can pretty easily build loop routes of almost any length that you’d want. Our route had more out and back than we planned due to taking the “wrong” 812.

CdA seemed to have more wildlife. We saw many moose, a coyote, a few deers, and tons of birds.

Both are great and neither had much traffic.

Appendix C: Making a fender with campground materials

  • Reverse the dummy bolts in the rack mounting bosses on your seatstays so that they stick out a little bit.
  • Tie sticks to those bolts and the seattube.
  • Cut a few holes in a tyvek envelope (I brought this as a saddle cover), freeze dried food bag, or other trash and tie it to the sticks.

Appendix D: We need a name…

This isn’t touring, because we didn’t carry our gear. It isn’t mountain biking because the terrain wasn’t that technical and we went more miles. I guess some people call it “Adventure Cycling”, but to me that is the name of a magazine about bicycle touring. This is my favorite style of riding, and there isn’t a name for it.

Appendex E: Other links

Jack Pass

Jack Pass is north of Skykomish and east of Index. 10 years ago you could ride a nice loop between these three points, but now the road from Index to Jack Pass has been taken over by the Skykomish River. We parked at Beckler River Campground with a goal of seeing what laid on the other side of the pass, maybe going to check out what remains of Mineral City, explore future camping destinations and to see what the washouts really look like.

We planned this ride a few weeks ago, but the weather threw us a curve ball on Saturday afternoon. The forecast of high 60s and mostly sunny turned into 50s and heavy rain. I was ready to cancel when Rory wrote these words:

I say there’s 2 choices:

1. “remember that memorial day alex made us ride through that monsoon

on Jack pass?”

2. “Remember that memorial day we sat inside waiting for the rain to

stop?”

This is the stuff adventures are made of.

How can you say no to that? So on Sunday morning at 9am we all met at my house and drove up to Skykomish.

Mark had pointed out on the map that there were two ways up Jack Pass. Our plans were to take the left fork up the pass, then come back down on the main road. The plan started badly when I left our maps in the car. Thankfully I had my GPS, but scrolling around on the tiny GPS screen always takes a lot of time. We found the correct fork, and took it.

That ended pretty quickly at this washout, but we did find some future camping potential up there.

We backtracked and took the main road up Jack Pass. Going from South to North Jack Pass isn’t too steep and the climb went by pretty quickly. The scenery along the way was great, with small rushing down the mountain, and a few viewpoints with nice vistas to the right.

Michael (rear) and I (front) climbing up Jack Pass.  Photo by Rory.

Lee and Michael near the pass.

The descent down into the Galena valley was fast. Very fast. It felt like it only lasted for 5 minutes, although it probably was longer. At the bottom we found the one gate that we needed to cross that day,and this awesome waterfall. The gate was a good sign,gates mean almost no traffic.

Riding in the valley.  Photo by Rory.

Beyond the gate we found about 8 miles of old road which is hardly used anymore. Riding in this valley you can see that there is a constant battle between road builders and the river. It seems as though the river has won.

The road ends here. If you click on the image you can actually see some blacktop across the river. Lee, Mark and I took a short walk and explored that section of road, then found another washout. The next few photos show what we found over there.

The Rapha guys showed that one can get around this area if they are willing to wade. I wouldn’t mind trying that someday in the future and when the water is lower, but on this trip we decided that this was our turnaround point.

On the way back out we took the bridge over to Silver Creek to see what the trail was like up to Mineral City. Having left the maps in the car we didn’t have a good idea of how far we’d have to go. What we found was a rocky road with a stream running down the middle of it. 10 minutes of climbing up it was enough for us, and we turned around. I checked the maps later and it looks like we’d have to go up the road about 3 miles to find the ghost town. That would be a good side hike on a camping trip back in this valley.

Mark

I took this one last photo as we started up the ascent out of the valley:

Climbing up Jack Pass in this direction is much harder than it was in the other one. The roughly 1000′ elevation gain is about the same, but the road on this side is about half as long. I checked the elevation profile when I got home and it was about 2 miles of riding a 10% grade. All of our conversations disappeared as we each picked our own pace and made it to the top.

The ride from the pass back to the car was about 10 miles of downhill. It went quickly and enjoyably. We got to the cars having spent a wonderful day riding without rain, exploring new areas that I think we’ll all return to, and enjoying a nice day on the bikes.

As we were putting the bikes on the cars Mark ran into another SIR member who was camping there. We were just pulling out when he invited us back to his campsite to help eat leftover food. I don’t think 12 hot dogs have ever been consumed so quickly. It was a great finish to a long day.

My photos

Rory’s photos

Rout
e

Two frames for sale (UPDATE: BOTH SOLD)

These are from projects which never materialized. Click the single image of either bike and see a whole gallery of images. Both are sized for men in the 5′9″ to 5′11″ range.

New (never built) Rawlands dSogn, size M/L (SOLD)

This is an “adventure” (their term) frame which builds up into a great offroad touring/cyclocross/mountain bike/do it all bike. It fits tires up to the 2.3″ Pacenti Neo-Motos in 650B, or around 700×40mm wide tires in 700C. It has a geometry that is nice on road or off and has all of the mounting points for touring gear, or builds up as a lightweight bike without all of that stuff. I personally think it is much cooler than the classic Bridgestone XO-1.

When I bought this frame they were out of the canti model, so I ordered the disk model. I thought I might want to use canti brakes, so I ordered it with a canti fork. Both forks are included, or I’ll sell it with just the disk fork for $40 less.

Geometry:

  • Seat Tube (C-C): 50cm
  • Effective Top Tube: 57.5cm
  • Standover: 81cm
  • Seat Tube Angle: 73 degrees
  • Head Tube Angle: 73 degrees
  • Fork Rake: 50mm
  • Trail: 47mm with 650B x 33mm tires, 55mm with 650B x 58mm tires
  • Head tube length: 19cm
  • Chainstay Length: 45cm
  • BB Drop: 60mm
  • Wheelbase: 1053.7
  • Seatpost: 27.2mm
  • Headset: 1 1/8″ threadless
  • Bottom bracket: 68mm

Condition is basically perfect since this bike was never built up.

$XXX plus shipping (or $XXX with just one fork) (SOLD)

58cm 1983 Trek 520, 650Bified (SOLD)

This is a 1983 Trek 520 which has been converted to 650B wheel size and with all of the brazeons added to make it a great city, randoneeuring, or touring bike. It fits tires up to 38mm wide. The tubing is lightweight Reynolds 501 in standard diameters so it rides nicely. It has long horizontal dropouts so you can build it up any way that you like (derailleurs, fixed,internal hub gear).

Condition is pretty good. There are not dents in the tubing. The silver powder coat has a lot of smudges and dirt,but there aren’t any chips.

The following brazeons were added by a professional builder in Spokane: 3 water bottle boss cages, head tube pump peg, downtube shift bosses, mid-fork eyelets on the fork, canti posts (positioned for 650B wheels).

Geometry:

  • Seat tube: 22.5″, 57cm (C-T)
  • Top tube: 56cm (C-C)
  • Seat tube angle: 73 degrees
  • Heat tube angle: 73 degrees
  • Chainstays: 43cm
  • Fork offset: 55mm (trail: 44mm with 650B x 35 tires)
  • Bottom bracket drop: 72mm
  • Wheelbase: 1018mm
  • Seatpost: 27.2mm
  • Headset: 1″ threaded
  • Bottom bracket: 68mm

Includes a Shimano STX headset and a seatpost.

$XXX (SOLD)

Terms

Prices do not include shipping. Shipping will be done via the cheaper of FedEx or UPS. Local (Seattle) buyers can pick up get preference for 5 days. On 5/23/2010 I’ll get back to the first non-Seattle buyer who expressed interest and work down the list.

Payment via PayPal or cash, no checks.

I can face the headset and/or bottom bracket if desired at no cost.

When every bike looks like a project…

Having the ability to modifybicycle frames means that I always modify bicycle frames.

I rebuilt the front of Christine’s bike, turning it from this:

into this:

It started with a pretty simple plan of building a low trail fork and a front rack. When I had the bike apart I measured it and discovered that the seat tube angle was 75 degrees (very steep!). Christine has complained a little ofwrist pain, and this might be the culprit. I couldn’t slacken it without making the head tube angle very slack and screwing up the handling. I debated selling the frame and building a new one from scratch, but ultimately decided just to modify it.

I gave it some thought and decided to move the head tube back and make the head tube angle steeper. This would allow me to raise the front end, and slacken the seat tube angle. I went from a seat tube angle of 75 degrees to 72 degrees (this made the saddle sit 3cm farther back from the cranks), and also have a head tube angle of 72 degrees. Rotating the bike back around the rear wheel raised the very low (for 650B) bottom bracket by 20mm. Raising it 10-15mm would have been ideal, but this is still within acceptable parameters. The top tube is now 50cm instead of 53cm, which gives us more options for adjusting reach. The drawing above shows the old (grey) and new (red) geometry.

While I had the bike “under the knife” I also made some other modifications.

I made this “sunburst” styled rack. It was influenced by the Ahearne rack that was on his 2007 NAHBS mixte.

The fork is new. It has much nicer blades and 23mm additional rake. The additional rake will help with the handling when there is a front load and kept the front center (distance from the bottom bracket to the front hub) from getting too short. A too short front center results in bad toe clip overlap.

There is a new chaincase and I moved the chainstay cable housing stop forward to be compatible with the Nexus hub. The chaincase is a Hebie Chainglider. It works surprisingly well for not mounting to the frame, it just floats on the chain. It isn’t too much work to get on and off.

I removed the right downtube shifter boss and added a hole for routing the taillight cable through the downtube. I like to reinforce such holes with a water bottle boss.

There are still a few things to do before getting the frame powder coated (which might not happen until fall, because Christine uses this bike regularily for commuting to work):

  • Cable routing for the headlight and taillight wires on the fork.
  • Remove the rearward chainstay cable stop.
  • Maybe remove the left shift boss and put on a split shift cable boss.
  • Maybe move thechainstay bridge 2cm closer to the dropouts. It is crazy far right now.

If I worked at Soma I’d argue for some revisions to the basic frame. The 50cm mixte should probably be built with 26″ wheels (not 700C) in mind. This would allow the top tube to be shorter, so the seat tube angle could be 72 degrees from the factory. A 75 degree seat tube angle is way too steep for a bicycle with an upright seating position. Finally if the chainstay cable housing stop were about 2″ forward of the stock location it would work well with Nexus and SRAM internal hub gears or a rear derailleur. The current location only works with a rear derailleur.

more photos

Better ways to hang a Hennessey Hammock

I love hammock camping. I hate the Hennessey Hammock knot. It is annoying to tie in the first place, and even more annoying to adjust for tension. This article might not make much sense if you don’t use a hammock for camping.

Andre shares in my dislike for the Hennessey Hammock knot. We both took different approaches to fixing this.

His setup is on the left, mine is on the right:

Here are the core pieces of hardware:

On the top is my hardware. It consists of two descending rings tied to a piece of cord. A smaller piece of cord holds a stake.

Andre’s hardware is a cam-lock buckle which is tied to the end of his hammock.

Both start with looping some webbing around the tree, and then back through a loop that is sewn into the end of the webbing. Ignore the buckle on this loop, it isn’t used for anything related to hammocks. I put those on my webbing so that I can dual purpose them as compression straps. This is already a major advantage compared to the Hennessey Tree Hugger method because the webbing can handle any diameter tree (with a max based on the length of your webbing). The Hennessey Tree Huggers tend to work best with trees about 1.5′ in diameter and are too short for larger ones and too long for smaller ones.

I use a knot called a Marlin Spike Hitch to put a spike (this could be a stick or tent stake, I use a small piece of aluminum) into the webbing. The Marlin Spike Hitch is a long name for a very easy to learn knot. Then I hang my loop of cord with the two descending rings from it:

The cord is looped through the descending rings using another fancy sounding knot called the Garda Hitch. It is really a very simple knot too. The advantage here is that you can tension the hammock just by pulling on the loose (free) end of the rope. When you light down in the hammock the rings pinch the cord and prevent it from slipping. If you need to loosen one end of the hammock you just separate the rings and the cord slides out from between them.

Advantages of this system:

  • You don’t need to modify the hammock at all, the standard long cord works well. My hammock cord was worn out though, so I did need to replace it with the purple one shown.
  • Easy tensioning
  • Light weight

Downsides:

  • The descending rings are expensive ($3 each, you need 4) and you need a tent stake or something else as the spike.
  • Two knots to learn, but both are much simpler than the knot that Hennessey uses.

Andre’s system is even simpler. He cut the cord off of his hammock and replaced it with a cam-lock buckle. He carries much longer lengths of webbing. You wrap the webbing once or twice around the tree, then thread it through the cam-lock buckle. It is easy to adjust the tension. There is nothing else to it. He used low-stretch polypro webbing.

Advantages:

  • Pretty inexpensive (cambuckles are cheap, 30′ of webbing is more money).
  • No knots!

Disadvantages:

  • Webbing is bulkier and heavier to carry than cord. My solution requires carrying about 8′ of webbing (for the two tree huggers). His solution requires carrying about 30′ of webbing.

We weren’t clever enough to invent these systems on our own. There is a 20 minute video on Youtube that goes into both and some other options:

HammockForums has days worth of reading on the subject too,and this is a good summary of some other options.