Archive for the ‘Brazing’ Category.

Realized

Imagined:

Realized:

Full photo set.

Next steps — Build it up(they knobby rear tire isn’t staying) and ride it, then build a rack for it. Alistair helped me with alignment today and took a few photos too. The framebrazing is done except for a couple of water bottle bosses and whatever other brazeons I realize that I forgot.

We measured the angles today, around 71.5 seat tube angle and 73.5 for head tube angle. Fork offset is around 30-35mm (this is a fork from a Bike Friday Family Tandem) giving a trail of about 35-40mm and flop of about 10-11mm. Right in the ballpark.

A little bit of progress on everything

I have nothing finished to show, but I have progress on the deck, cargo bike, and my bicycle jig.

The deck is half done. We were hoping to finish it this weekend but the 90F weather kept us off of the roof. We’re also waiting on 5 more boards to be delivered. The new decking is Tigerwood (from Ecohaus) and I really like how it looks so far. We’re using hidden fasteners called EB-TY. It took us a little while to figure out the best way to build the deck (especially because we are doing it in sections so that it can be disassembled), but now it is going pretty fast. Hopefully we can finish it up next weekend.

I’m embarrassed to show these photos of the cargo bike and fixture in progress because they show how much of a slob I can be about my workspace. The basement is a disaster, but I never feel like stopping work to tidy up.

The CAD drawing has been updated. There are a few changes and I switched the drawing to much easier to work with software (TurboCAD, I was using QCad).

/P>

Real progress on the cargo bike is occuring on two fronts. The first is building tooling that will be used on any frames that I built. I have most of the front triangle fixture completed. I’m building my fixture around a milling table that is 9 inches by 36 inches with 3 T-Slots running the length of the table. This table is accurately machined flat (not as perfectly as a surface plate, but well enough for bicycle frames) so I can also use it as an alignment table.Everything will be modular so that I can use the same base for building forks, rear triangles and other things.

Here is the table setup as a front triangle jig:

The bars under the seat tube and head tube are made from pieces of 80/20. They have T-slots in them too and are connected to the table using some brackets that I made. The brackets connect to the 80/20 usingT-Nuts that 80/20 sells and to the T-Nuts for the milling table. The milling table T-Nuts are setup for 1/2-30 bolts that are huge, but I bought some reducing bushings from McMaster-Carr that let me use smaller bolts. I can adjust them to any angle (using a protractor to check the angle) and then lock them into plate.

The tubing is held in these towers which are also primarily 80/20 with tube holding cones that I made on the lathe. I got the idea for these towers from a bicycle jig on Instructables, but changed the setup to be height adjustable. I shouldn’t need to adjust it once the whole thing is dialed in.

The bottom bracket is held in place with a vertical post and cones which sit on it. This is sort of an exploded view, with the top cone loosened. Everything is clamped in place with two clamping collars.

The other progress is on the cargo bike itself. As you can see in the first photo the donor frame has had it’s paint stripped (where I need to braze to it) and the headtube and downtube have been cut off.

The cargo tube on the cargo bike has some really tricky mitering. I built a fixture to do this miter (and others) on the lathe. This is what the mitering fixture looks like: (I’ll take some photos of it in use next time I’m using it).

It mounts to a T-Slot in the lathe’s compound slide. I can set the angle to on the compound slide to my miter angle and then use a hole saw to make the cuts. That block was made on the lathe and boring a 1.75″ hole took a long time. I’ll be able to use it for other tubing sizes with some reducing bushings that I need tomake. The mitering fixture works really well,but I need to tweak it a bit to get it better centered. Right now the miters are about 1mm off of center.

In that photo you can also see one of my test joints (I’ve made three of these and cut the other two apart). I’m pretty happy with the brass penetration that I’m getting,but the brazing looks a little sloppy and will require cleanup work. I’m getting better with practice, these big joints are a lot different than the little ones that I make for racks.

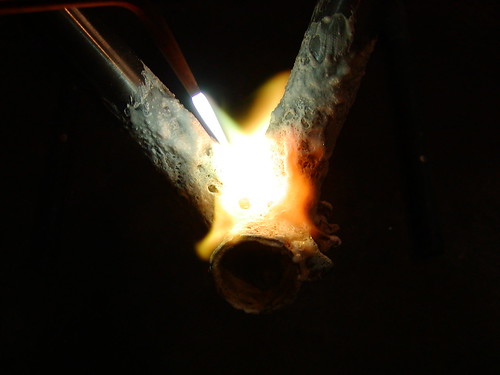
The joint is neat because the smaller tube completely pierces the larger one. When looking at it from the end you can see light coming around the smaller tube:

My new bike project — Cargo Bike

A year or two ago I drew up this design for a 20″ front, 26″ rear wheeled cargo bike and posted about it on this blog. This basic design is often called a cycletruck after the classic Schwinn sold around WW2.

The idea is that a smaller front wheel leaves more space for a big rack over the front wheel. The nice thing about this design is that the wheelbase is normal (so I can easily store the bike), but it has a pretty large hauling capacity. James Black extended this design in his cycle truck (built by David Wilson) by using a large boom over the front wheel to support the rack and 20″ wheels front and rear to allow for a low rear rack too. His cycle truck is probably the best of the compact cargo bike designs that I’ve studied or ridden.

One of my planned brazing projects has been to build a cycletruck of my own. I wanted to keep it simple, so I’m starting with a donor MTB frame. Yesterday I was going by Recycled Cycles and found the perfect frame on their free rack — a ~1990 Trek 800 in my size. To most people this is pretty junky, but for this project it’s exactly what I needed. The tubing is unbutted, so I can cut off the head tube and braze on a new one without worrying about where the tubing gets thin. It looks like it has already lived a good life, so I don’t feel bad chopping it up. I also have an old Bike Friday 20″ fork that will work nicely for the front wheel.

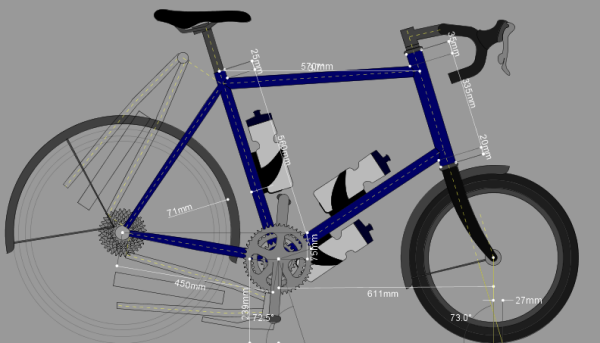
Here is the CAD drawing of what I plan on doing to it (click for big if you want to read dimensions):

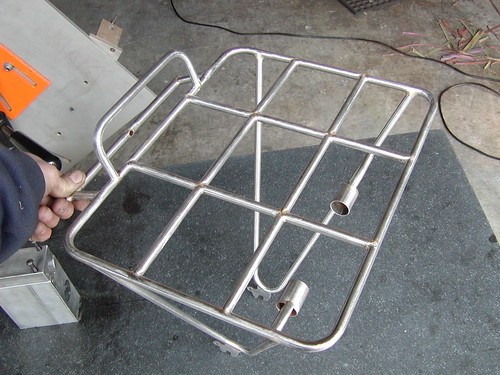
The plan is to braze on a new head tube which is longer and steeper (73 degrees vs the 71 degree HTA on the bike today). Then I’ll run a 1 3/4″ x 0.058″ tube from the seat tube, around the head tube, and sticking out over the front of the bike. The original downtube will miter into this (or I’ll make a new downtube that goes from the BB to the base of the head tube). A roughly 18″ by 20″ rack made of 1/2″ tubing will sit over the front wheel.

It’ll be challenging for me, I haven’t done anything on this scale before. A few of the tricky bits are going to be making a nice through hole in that 1 3/4″ tube for the head tube and fixturing it to keep the frame well aligned during the brazing process. I’ll need to build tooling for some of that and plan on documenting my progress as I go. I have an aggressive goal of having this finished by the July 4th Cargo Bike Ride, but if I miss that target I won’t be surprised or feel too bad.

Seattle Framebuilding Chat

(photo by Alistair Spence, from his flickr site)

A couple of weeks ago I posted a message on the framebuilders list inviting amateur and hobbyist builders to come over to my house for some beers, chips, and to talk about building bikes. Yesterday was the day and Alistair Spence, Dan Boxer, Joe Dube, Mark Bulgier, Eric Bailey, Colin Stevens (who helped friends move by bike earlier in the day) and myself met up at my house. A couple of others were interested, but couldn’t make it this month.

Mark brought a bucket full of lugs (sadly I didn’t take a photo) which we spread out on the table and which triggered a lot of conversation. He also had a couple of cut apart joints from some of his earlier bikes. Eric brought two forks and racks that he had been working on. Dan rode over on a bike that he had built, and Alistair had his highly modified Rivendell Porteur. I showed a bottom bracket post that I was building for my alignment table. Joe and Mark brought a lot of interesting stories about welding and we talked about Ti, brazing,lugs,dropouts and lots of other things.

Almost 5 hours, 15 or so beers, a bag of chips, much cheese and hummus later we parted ways. Everyone had a good time and we agreed to do it again in August. We’re going to rotate shops and will meet at Joe’s next time. Seattle isn’t Portland when it comes to the number of people building frames, but there is still a lot of interesting stuff going on here. By getting to know each other I think we’ll all be able to better share knowledge and develop our craft.

Great Rack Building Sequence from Alistair Spence

Alistair just finished up this large porteur rack for his tandem and posted an extensive series of photos documenting the process. He also annotated many of them, giving a lot of hints along the way. It’s recommended viewing if you are interested in rack building.

Some folks have been asking me in comments about tricks for making miters that aren’t 90 degrees. Alistair covers this well starting at this photo.

Another flickr gallery that I’ve been enjoying comes from Mike Flanigan of ANT Bike. He has a lot of shots showing his homemade fixtures.I’ve been interested in making fixtures of my own and there is a lot to learn from these photos.

Recent Projects in the Workshop

Racks

Andre and Lee visited a few weeks ago to build a couple of porteur racks. They were finished a few weeks later. Andre’s rack is for a 700C Kogswell P/R fork which he installed onto a Surly Long Haul Trucker. Lee built a rack for his Surly Pugsley.

Andre’s rack on the Kogswell fork:

Lee looking Surly on his Pugsley with the porteur rack (there is also one of me riding the bike):

Head shot of the Pugsley rack showing it’s asymmetric design (remember, the dropouts are not centered):

The Pugs handles pretty well with the big load, those 4″ tires have a lot of pneumatic trail. On the same day Andre proved that the Pugsley tires don’t fit onto standard 559mm rims (even Sun Doublewide) — they require a rim with a deep drop section.

Lathe project for the aquarium

We have a moderately large (60 gallon) planted aquarium in our living room. For a long time I’ve wanted a way to watch the water temp as we fill the aquarium. Our normal method involved one person adjusting the valves on the sink and the other feeling the water coming out of a hose 25′ away.

I used the lathe to make this simple aluminum tube with hose barbs at each end. A liquid crystal thermometer is stuck onto it. It gives instant reading of the fill water temp and didn’t take long to make. This photo isn’t great, but the thermometer reads 76 degrees (the green block in the middle).

And back to Racks…

Finally a picture of how I jigged a Rene Herse style fork crown mount while brazing. This went onto the rack for my Pass and Stow bag that I recently blogged about. A Kant Klamp is clamping the U shaped piece to a bit of flat stock, and that is leaning in the vise.

Freight Pass and Stow bag and prototype rack

One of the coolest booths for me at NAHBS 2008 was from Pass and Stow. Matt Feeney has designed a nice porteur rack that can fit on almost any fork and which has a good size platform (not huge, not tiny) and which can hold panniers too. He also worked with Freight Bags to develop a bag for the rack, and came up with a really clever attachment system based on “Lift the Dot” fasteners.

I bought one of the bags that was at the show as soon as I could. It arrived on Saturday and I quickly assembled this rack for it:

It looks a lot like most of the racks that I’ve made. It has one unique feature, which are the lift the dot studs on the bottom of the rack. There are four for them, one for each corner of the bag. The bag has four matching mounts and they click together like this:

This mounting system makes it very easy to install and remove the bag. It is a big improvement from bungie cords.

The bag itself is wonderful for commuting. It is large, much larger than a Ostrich or Berthoud bag. It is built like a messenger bag with a waterproof liner on the inside and a rough Cordura fabric on the outside. There is one large main pocket and a smaller front pocket that secures with velcro. The shoulder strap is made of seatbelt webbing and the bag is comfortable to wear as a messenger bag even with it’s unique proportions.

A cool feature that I missed at the show are “long flap” straps like the ones on a Carradice. This lets you overstuff the bag and ride with it wide open while having a secure load. I’m sure this will come in handy when stopping by the grocery store after commuting home.

There are compression straps on the side which let you cinch down the bag when it isn’t full. This is how it looks with my normal load:

The bag is a little wide for 42cm drop bars (I doubt that it was designed with drop bars in mind), but the width makes it possible for my (smallish) laptop to fit. I think it will be a more comfortable fit with 44cm drop bars and may switch.

I consider this rack a “prototype” because I experimented with a few things on it. I tried two different methods of making brazeons for the “Lift the Dot” studs. The studs themselves are threaded #8-32 with brass (pretty soft) bolts. The better mount that I made for them just consisted of a very short section of 1/4″ x 0.058″ tubing mitered and brazed to the bottom of the rack. After brazing I drilled out the center with a #29 drill bit and tapped for the #8-32 bolt. I also tried drilling 1/4″ holes in the rack and using a longer section of the 1/4″ x 0.058″ tubing, but that was fussier to keep aligned and required more work.

I also played with different methods of attaching the rack to the frame. I made a lug for the left stay by drilling out the center of 3/8″ steel rod to a 5/16″ hole (the same diameter as my rack tubing). I then filed down a tab to mount to the frame. My brazing on this is pretty ugly, but the lug looks nice and wasn’t hard to make. I think I’ll do it again:

I copied the Rene Herse fork crown mount and I’m pretty happy with how that came out:

That is a 180 degree half circle of 5/16″ x 0.035″ tubing. Mitered at the halfway point is another section of 5/16″ x 0.028″ and a M6 stud (long bolt with the head cut off) is brazed into that sleeve.

The backstop on the rack is brazed onto the back of the rack instead of the top, which gives it kind of a nice flow. It is a bit annoying to get all of the bends to line up correctly though, and my backstop isn’t exactly square with the rack. It’s fine for a prototype:

Great bag, good enough rack. You can order the bags through Matt and Pass and Stow.

A couple of bike projects

Rory came over this morning and built the platform for a rack an upcoming bicycle.I used the lathe to make the piece of metal which the bag hooks onto.It centers the bag on the rack and is a slip fit over the 5/16″ rack tubing. I like his compound bends and lowered front stay formaking the bag sit flat even though the hooks sit a little below the bottom of the bag.

This afternoon I worked on my canti boss brazing fixture. It is built around a80/20extrusion using two of their stanchion holders. I make dummy axles on the lathe and asupport for the cantilever bosses using my new mini-mill.

The dummy axles are made from steel. There is a common spacer to adapt them to the 1″ diameter hole that is made from aluminum:

The canti boss holder is made from aluminum.I milled slots for holding the canti fixtures. I have a lot to learn about using the mill:

Here is the mill (a Sieg X2), it was a birthday gift to myself:

Rack Building Basics — Eyelets

It’s been a long time since I’ve posted a Rack Building Basics entry, but I still have some in the queue.

Today’s photo series is about making the eyelets that connect the rack to the fork or frame. There are a couple of ways of doing this, but this series focuses on doing it with brazed in tabs made of flat stock. This is similar to how dropouts are made.

The first step is making a slot in the end of the tube for the tab. I draw the slot and then use a hacksaw and a thin file to make it:

Now we need to cut a piece of flat stock to fit. I purchased 3′ of 1″ wide 4130 which is perfect for this purpose. You only need to make a single cut. I use the tubing as a gauge to how wide it should be.

The tab is the same width as the tubing:

Brazing just the tab in is probably strong enough. Note that I filed the end of the tube to slope the tubing towards the tab:

I like to fill the whole end of the tube with a “plug” of brass. To do this you heat the whole end of the tube and draw the brass around below the tab. I’d do a few tests first and cut them apart to see how well you do at pulling the brass in. It is a bit hard to see in this photo, but the whole end of the tube has brass in it.

After removing the flux I doa little work with a round file (12″ round which is about 10mm or 3/8″ in diameter) to make a nice clean scallop. The tab has also been bent to match the angle needed for this rack:

A bolt hole is drilled and a file is used to ease off the edges:

A final photo showing where this tab is used on the rack. It connects the stays to the fork blades:

At the start of the entry I mentioned that there are other alternatives. A nice and easy one is to braze a piece of tubing perpendicular to the stay and run the bolt through it.5/16 x 0.035 tubing is a nice fit for an M5 bolt. This is an especially good idea if you need a spacer to clear part of the fork blade. In this example the tubing is extended on the inside so that the rack can clear the fork blade even if the fenders aren’t installed. This is from the first rack that I built:

Another option is to simply flatten the tubing in a vise and drill a hole through it. I think that this looks a little less refined, but it is strong. Sorry, I don’t have any photos of this approach.

Rack Building Basics — Tubing Selection

Basics

Selecting tubing for a rack is an important first step in building a rack. The number of options is fairly limited based on weight and the accepted standards to work with things like pannier hooks. Selecting tubing sizes will also help you decide which bender to buy.

The three basic outside diameters to choose from are: 3/8″ (about 10mm), 5/16″ (about 8mm), and 1/4″ (about 6mm). There are two wall thicknesses that I’ve worked with: 0.028″ (about 0.7mm) and 0.035″ (about 0.9mm).

I made this spreadsheet to help figure it all out. For these three sizes of tubing and two wall thicknesses it provides the weight of a foot of tubing and the deflection when there is 10 pound load on a cantilevered beam. That second measurement isn’t specifically useful by itself, but it gives an idea of the stiffness of the tubing. I hope that I got the deflection math correct, I didn’t do a test to verify it.

Name Outside Diameter (inches) Wall Thickness (inches) Inside Diameter (inches) Weight of one foot tube (oz) Deflection of one foot tube (inches)
3/8 x 0.035 0.375 0.035 0.305 2.0357 0.3552
3/8 x 0.028 0.375 0.028 0.319 1.6621 0.4194
5/16 x 0.035 0.3125 0.035 0.2425 1.6615 0.6500
5/16 x 0.028 0.3125 0.028 0.2565 1.3627 0.7586
1/4 x 0.035 0.25 0.035 0.18 1.2873 1.3831
1/4 x 0.028 0.25 0.028 0.194 1.0633 1.5868

There are some interesting properties to note:

  • The 0.035″ wall thickness tube of one size is close to the weight of the 0.028″ wall thickness tube of the next size up.
  • Outside diameter has a bigger influence on stiffness than the wall thickness, but both matter.
  • 1/4″ OD tubing slips nicely into 5/16 x 0.35 tubing, and 5/16″ OD tubing slips nicely into 3/8 x 0.028 tubing. This is very handy to know when you are splicing two sections of tubing together.
  • The heaviest tubing is over 4x stiffer than the lightest tubing, but less than twice as heavy.

Handlebar Bag Rack

A handlebar bag rack is designed to support the bottom of a handlebar bag. It is smaller than the bottom of the bag. The bag isn’t tightly connected to it in most cases, so the rack doesn’t need to be designed for high lateral loads. They connect to the fork blades at the mid-point or higher, so there aren’t long unsupported beams. As a result of these design parameters they can be made with fairly lightweight tubing. So 1/4″ x 0.028″ tubing everywhere is probably enough. Some of the classic French racks are made with even smaller tubing (4mm outside diameter).

A standard sized handlebar bag rack has a platform of about 4×7″ or 5×7″. There is one cross member at the middle of the platform and two stays going to the fork blades. For a 5×7″ platform with 8″ stays this gives us a total of (5*2)+(7*2)+5+(8*2)=45 linear inches of material. There will be a little more for the backstop and fork crown mount.

Using 1/4″ tubing we can build the basic rack (no backstop, no fork crown mount) in 4oz of tubing. Using 3/8 x 0.035″ tubing the rack would weigh 7.5oz, a pretty large weight gain since we don’t need the stiffness. Going with 5/16″ only adds an ounce,so that isn’t too big of a deal (especially if you don’t have 1/4″ tubing or bender).

Porteur Rack

A porteur rack is a much larger platform rack that is designed to have the load strapped directly to the rack. The rack is expected to work with loads of 50lbs or even more. The stays on the rack usually connect directly to the fork dropouts,so there is a longer unsupported span (from the fork dropout to the front of the rack).

On these racks lateral stiffness is important. We can get some lateral stiffness from smart design (good triangulation), but we also need to get some of it from the metal. The stays are over a foot long, and we wouldn’t want the rack to shift by an inch or more with a moderate side load (as you’d find when going around corners).

Porteur racks also have a lot more metal. I’ve been building them with 4′ rack circumference (this is a roughly 14″ by 10″ platform), 4 cross members (10″ each), and two staysper side (around 15″ each). That is about 148″ linear inches of metal. One made with 3/8 x 0.035″ tubing would have about 25oz (still under 2lbs) of steel.

You can optimize the weight be mixing and matching tubing. The circumference can be made with 3/8 x 0.028″ tubing and still handle most loads. 3/8″ x 0.035″ tubing makes sense on the stays to minimize side deflections. The cross members can probably be made with 5/16 x 0.028″ since they aren’t that long and each cross member doesn’t carry a lot of weight. By mixing and matching we can get the weight down to 21oz (4oz savings)without compromising the integrity of the rack.

Recommendations

  • 1/4″ or 5/16″ for handlebar bag racks (5/16″ if you plan to zip tie a basket to the rack or carry heavier loads)
  • 3/8″ for heavy duty porteur racks
  • 5/16″ for cross members on porteur racks or lighter duty porteur racks

If I were starting out I think I’d get a 5/16″ tubing bender. 5/16″ is a good balance of being big enough to make moderate duty porteur racks and cargo racks (Bruce Gordon racks are 5/16″) and 5/16″ x 0.028″ is light enough to make a decent handlebar bag rack. The benders are cheaper too, a Ridgid 405 5/16″ bender is about $60, while the Ridgid 506 3/8″ and Swagelok 3/8″ benders are about $200ea (Ridgid also makes a cheaper 406 3/8″ bender, but I don’t know how well it performs with cromoly steel).

You can go too flexible. Rory and I built a handlebar bag rack for his bike out of 1/4 x 0.028″ tubing. The stays connect to the fork dropouts and the bag connects just to the rack. It works, but he says that it is pretty flexible with heavy loads. I think that we’d both use 5/16″ tubing if we were building it again. We’re going to build a couple of small porteur racks with 5/16″, and I’ll report back on how that works once they are done.

Tubing Sources

It’s hard to find tubing in these dimensions in the US. I know of two reliable sources, Aircraft Spruce and Dillsburg Metal. Aircraft Spruce has much easier ordering (you can order online), but Dillsburg is a bit cheaper, especially if you need high quantities.

I’m going to be away for about a week, so it’ll be a little while before the next entry. Leave comments or email me if you have any requests. I know this one didn’t have the interesting photos, next week we’ll be back to photo oriented entries.