Archive for the ‘Uncategorized’ Category.

mountain bike weekend

Rory and I left work about an hour early on Friday and headed across the mountains for a pair of back to back mountain bike rides.  On Friday night we explored the trails over Roslyn, WA, trying to follow a map that we had for a route called the Rat Pac.  I think we were only half successful in following the route, but we had a great ride on a really nice clear evening.

Rory

Me

Nice views

Nice trails

Clear skies, bright moon

"slickrock". I don't think it really was, but the surface was fun to ride on anyway.

"slickrock": photo by Rory

This was probably not the most stable ground to stand on

There are more photos on my smugmug site and Rory’s Picasa site.

We had dinner in Roslyn at “The Brick” (made famous in the TV show Northern Exposure) and stayed at Rory’s parent’s cabin in Cle Elum.  The next morning we got up early and headed a bit farther east to the Taenum Creek area to do a 20 mile loop known as Fishhook Flats.  When Rory sent out the invite he put in this crucial statement: “The route will be fishhook flats, which i’m pretty sure is snow free by now(no guarantees).”  I should have learned from last year’s Mount Catherine ride with Rory that this was a sure sign that we’d have plenty of snow to ride through.

The ride was great, but we did walk 5 or more miles of the route due to snow.   We decided that this upgraded the ride from being sort of long into the epic category.  The riding that we did do was really nice though, without too much crazy steep stuff and with trails that were in pretty good shape.  I’m pretty sure we were the first people on most of the trails this season, there were no signs of other traffic through the snow.  The weather wasn’t as clear as on Friday night and it was a bit cooler, but we didn’t have any rain.

The route starts along this old decaying dirt road.

This was our first snow.

This large open field could make a great home base for a mountain bike camping weekend. There was space for at least 50 tents.

There was a fair amount of blow down this early in the season.

6 inch deep snow like this is the most frustrating, because it seems like it should be ridable, but it isn't.

We tried anyway

Peanut butter and honey in a packet might be my new favorite trail food.

Our second lunch stop location, down below the worst of the snow.

Where there wasn't snow there was plenty of mud. Photo by Rory.

The quantity of snow often had less to do with the elevation, and more to do with the exposure of the ridgeline and the thickness of the tree canopy.

Stream crossing

This last section along the North Fork Trail was snow free and really good riding. I was really tired by this point, so Rory had to wait for me somewhat often. The views of the creek below were nice.

The creek had plenty of bridges, all in good condition.

Lots of mud!

My photos

Rory’s photos

How it’s Made: Frame and Fork Alignment Gauge

First, a quick update on the tools that I listed in my last post.

Frame and Fork Alignment Gauge: Interest has been much higher than I anticipated.  I thought I might sell 10 of these this month, and ordered material for around 20 just so I wouldn’t have to visit Online Metals too frequently.  It turns out that wasn’t enough, and at this moment I’m out of material.  I’ll make another batch in a few weeks.  I’m keeping track of backorders and sending out invoices to buyers as I have the gauges made.  Hahn Rossman (who bought the first one) took a good set of photos of the gauge in his and posted them on his flickr.  I’m likely to raise the price on this by $5 to $10 soon, but that won’t affect any outstanding orders.

Fork Fixture: The prototypes are sold and will be shipped out soon (hopefully this week).  I’m going to scale back the kit to only include the parts that I make or modify or which are hard to source.  I’ll probably sell that kit for $90 (so $100 including shipping).  The buyer will need to source parts (including the 80/20 extrusions) from two more sources for about $60 and a dummy axle from Anvil, making the whole thing around $200.  Selling the fixture this way makes my life easier (less inventory to manage) and keeps prices low, at the cost of a bit more hassle for the buyer.  For the intended market (hobbyist builders) that is the right thing to do.

Now onto the actual subject, how I made the Frame and Fork Alignment Gauge.  These are made on my Taig CNC Micro-Mill and I took some photos while making a few of these today.  My mill is a small “toy” compared to the large scale CNC machining centers used at places like Anvil, but it is a lot more affordable and still allows me to make projects like this.

I designed the part in an inexpensive CAM package called CamBam. I use CamBam to both draw the basic shape, and then to produce "G-Code" which is what tells the mill how to produce the part. There are 3 basic steps in this part: Drill mounting holes, Engrave Text, and Profile (carve) the part.

I made this fixture plate which locates and holds the material as the cutting takes place. It is mounted to the table of the mill.

Raw material (4" wide by 0.25" thick aluminum) is cut from 6' lengths down to 290mm lengths on the bandsaw. These inexpensive bandsaws are sold by many importers. They aren't very accurate, but they work well for this application and save a lot of time compared to cutting stock by hand.

The raw material is placed on the fixture plate and clamped into place. There are 3 aluminum "buttons" at the top and left edges which are used to roughly place the material. It only needs to be accurate to within 2mm, because the whole edge will be trimmed by the mill when the part is profiled.

A 3/16 2-flute "drill-mill" is put into the mill's head. This is used to drill the mounting holes and to engrave the text that is on the surface of the part. It looks like a normal drill bit, but it is designed to cut both in down and side operations (normal drill bits only cut in a down operation). It is made of solid carbide. These bits aren't cheap, they cost about $10-15 each.

The 4 mounting holes have been drilled and it is now engraving the text. The mounting holes are 8.5mm, but can be made with this much smaller bit by moving the work under the bit as the bit is lowered into the work. That blue stuff is coolant which is continuously recycled and pumped through that nozzle to blow chips aluminum chips away and to keep the tool edge cool and well lubricated.

The text is engraved and the holes are drilled. Time to change the clamping and change the toolbit.

Clamping bolts have been inserted into the 4 holes, and the perimeter clamps and locating buttons have been removed. This makes it safe to remove material for the outside edge of the parts.

The toolbit has been swapped out for a 1/8" 2-flute endmill

The control software (EMC2) has been waiting patiently for me to change around the clamps and to swap the toolbit. Time to press continue and let it do the second part of the job. The purple lines show paths that the cutter has recently followed (so all of the engraving) and the white lines show the full path that the cutter will follow.

The left part is being cut into it's final shape. The toolbit spirals around the perimeter to define the shape, removing 1.25mm more material with each pass. It is moving at 30 inches per minute (800mm per minute) and the bit rotates at over 10k rpm.

The left gauge is complete, and the machine is moving over to cut out the right one.

Both gauges are complete. Now it is just time to remove them from the fixture block and to brush off waste bits and swarf (the aluminum "saw dust").

Once they've been cleaned and the coolant has been rinsed off I put them into the pile of widgets that is ready to ship.

This is what the machine looks like while it is in operation. It is pretty well enclosed to keep coolant and swarf from spraying all over the basement. The cart has a footprint of roughly 4' wide by 2' deep. This is a tiny CNC machine compared to what would be used in industry (and is less rigid and has less features, but costs far less too).

The machine runs for about 20 minutes to make two gauges, and I spend a few minutes in the process dealing with clamping down the material and changing cutters.  A larger CNC machine would allow me to make 10 or 20 of these at one time, saving a lot of time on tool changes and allowing me to clamp more material in place then walk away for an hour or more while it gets work done.  It would also be much more rigid, so the cutter could cut the full depth of the material at once instead of making multiple passes.

On the other hand the Taig CNC mills start at about $2000 (including the controller hardware, but not the PC), which is pretty incredible considering what can be done with them.  I’m using projects like this one and the fork fixture to help recover some of the costs from purchasing the mill in the first place.

I also have a long video on Youtube showing the mill in operation when cutting parts for the hinge on the fork fixture.  In that one you can see what the machine looks like in operation and a different style of fixture plate.

Framebuilding Kits

Upfront: The Rough Stuff NW blog that I started with John Speare is finally getting some new posts this week.  If you are looking for Pacific NW ride reports keep an eye out there in addition to this blog.

I’ve been knocking around the idea of selling some basic kits for building framebuilding jigs for a little while now.  My first foray into that is now on the blog (notice the new  “Store” button near the top) and at http://tools.alexwetmore.org.  I have two items listed so far: a Frame and Fork Alignment Gauge that I make on my tiny CNC mill and a fork fixture kit that is made using a mix of CNC and manual operations.

I have a dilemma with the fork fixture kit.  I’m trying to decide if I should go down the route of offering full kits (as that one is listed) where all parts are included and the item can be assembled in under an hour.  The other option would be to sell only the unique and hard to find parts in the kit, and provide the buyer with a shopping list and sources.  The latter option I could sell for less money (saving the purchaser) because I wouldn’t need to manage so much inventory, ship large boxes, or count out bolts and nuts as I assemble the kits.

If the fork kit were sold with only the unique parts it would include:

  • The axle clamp assembly.  The buyer would have to thread two holes, cut apart some webbing, and do a little cleanup with a file.
  • The piece of 80/20 which has been modified into a V-block.  I do those on the bandsaw and clean them up on my mill, they actually take a fair amount of time each to make.
  • The 4 pivot plates, which are my own design and not available from 80/20.  I’d also include the shoulder bolts that tie them together because I already bought a big box of them.
  • The piece of extrusion that holds the cross bar for supporting the fork legs.  It has a 1/2″ hole drilled into it which must be done a drill press or milling machine to be accurate.
  • The toggle clamp and mounting plate for the steerer clamp.  The toggle clamp that I use isn’t the easiest one to find, so I can save the buyer a lot of hassle by including it.

I could sell that, including shipping in a USPS flat rate box, for $100 (maybe a little less, I’d have to time myself in making one).  The buyer would need to order about $60 worth of items from McMaster Carr and 80/20 to complete the fixture and total assembly would take a bit longer.  In comparison I think I’m going to need to sell the full kit for $250 complete to make it worth my while, so the total savings would be around $100.

In the long term I’d like to offer subassemblies that can be used for building a full frame fixture and publish free plans on how to take those subassemblies and a shopping list from 80/20 to build a well thought out fixture.  The fork fixture is way for me to test the waters.  My overall goal here is to provide kits at an affordable price point to hobbyist and amateur builders (such as myself), pay off some of my expensive machines, and hopefully not spend so much time in the process that I still enjoy doing this work and maintain free time for hanging out with Christine and riding my bike.  We’ll see how all of that goes.

Kayak Building Class

I spent the last week in Portland taking a kayak building class by Brian Schulz of Cape Falcon Kayaks.  I took a pretty good number of photos during the class, and this very long blog entry (perhaps the longest that I’ve posted) will be a photo essay showing how we built the kayaks.  Jump to the very end if you want to see a photo of my finished kayak.

I took the class with 2 other students, Steve and David.  Brian was also building a kayak during the class for a customer in Portland.  David, Brian, and I were all building F1 kayaks, a design that Brian came up with.  Steve built a Greenland style kayak that Brian copied from historical drawings with some modifications to make it handle well with a larger paddler.

Here is a rough breakdown of how the class broke down:

  • Day 1: Build the top of the frame
  • Day 2: Build the bottom of the frame
  • Day 3: Finish the frame
  • Day 4: Skin the boat
  • Day 5: Apply polyurethane to the skin and make a paddle.
  • Day 6: Finishing touches (deck lines, foot pedals, back band, seat)
  • Day 7: Paddle

Each day was about 8 hours, starting at 8am and finishing around 4pm or 5pm.  The exception was Day 4 which was a 12 hour day, and Day 6 which was only about 3 hours.  We had to wait to Day 7 to paddle to make sure that the polyurethane coating was dry before going on the water.  I know that the class schedule has been tweaked over the years, so every class will be a little different.

Normally he teaches the class with 5 students,but ours was a little small due to a last minute cancellation.

I’m putting a lot of detail here,but it barely scratches the surface of what you learn taking the class.  It is a great class if you enjoy working with your hands, enjoy kayaking, and aren’t normally a wood working type of person.  I learned a lot and think I was far more successful than if I had tried this on my own.

Day 1
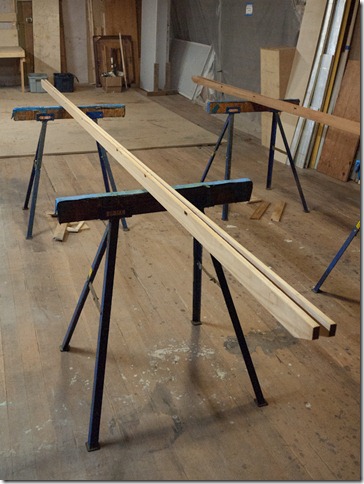
This is how we start the day.

We started with the two gunwales.  These were setup before the class and came to us cut to length and with the mortises already complete.  They are made from cedar.
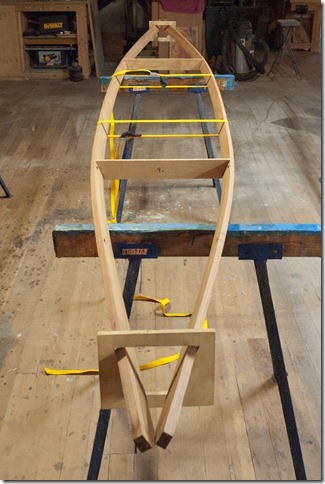
P1000154

P1000145My boat will be 22" wide

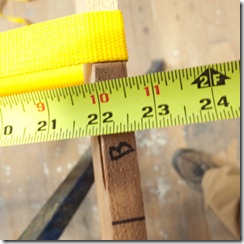
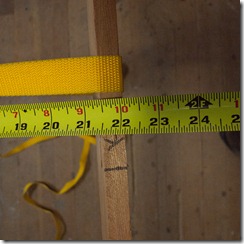
Using some simple jigs and cam-buckle straps we set the basic shape of the kayak.  This is a critical setup and also set the beam (width) of the boat.  We measured carefully at two points for the design.  Brian scaled our boats at this stage to fit our weight and intended use.  A kayak intended for a small woman was narrow, one that would only be used while camping was built a little wider.  My boat was in the middle.
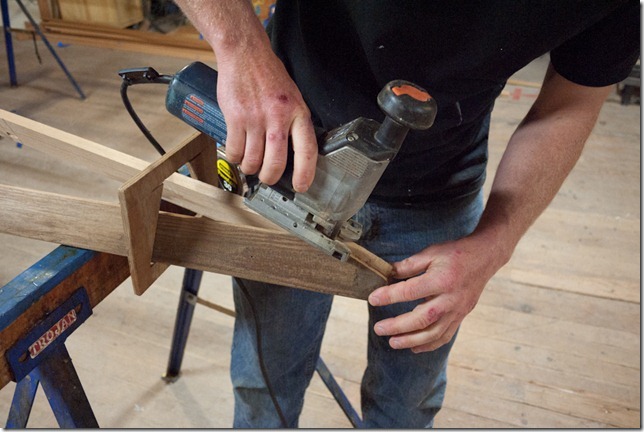
Using a jigsaw to miter the ends of the gunnels

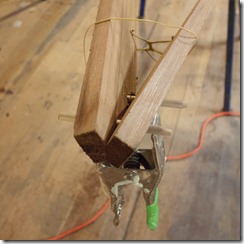
We needed to miter the ends of the gunwales to make them come together.  We did this using a jigsaw and many passes with light tension at the end of the gunwales.
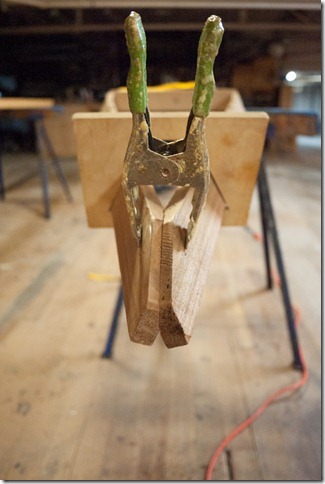
Cut and clamped

This is what the front of the gunwales looked like after mitering.  The same thing was done on the rear.
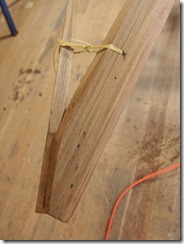
Tied together with twineP1000171

Our first of many lashings on the boat was used to tie the gunwales together.  They don’t align perfectly, but that doesn’t matter because we’ll be doing more cleanup work in this area later.  The joint was also pinned using two 1/4” diameter dowels.
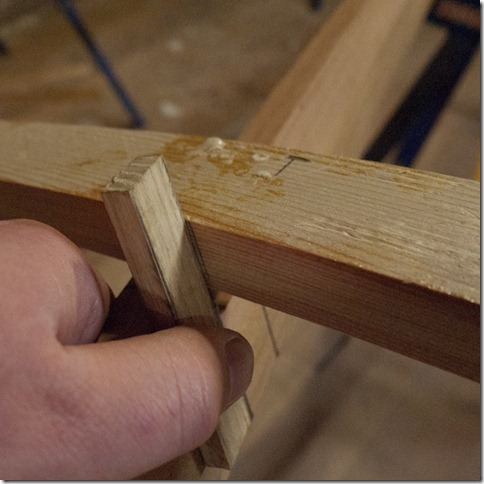
Marking the inside of each tenon

The next step was to mark and make the tenons on the deck beams.  The deck beams are used to connect the two gunwales and will form the top of the boat.  We used some scrap bamboo to transfer the width of the gunwales onto the deck beams.  The deck beams were mostly made of cedar, but the one right behind the cockpit (which sometimes needs to support the paddlers weight) was heavier and stronger spruce.
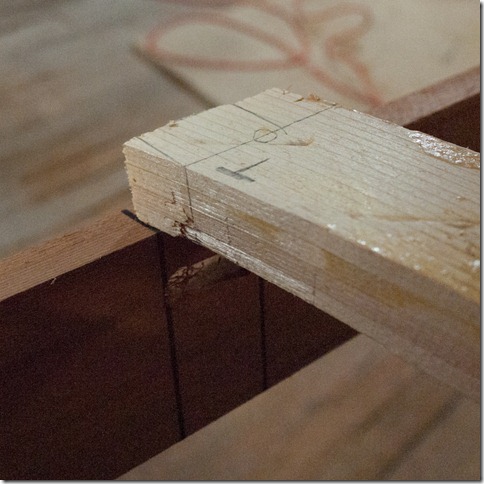
Tenon is marked out

This shows a marked tenon, ready to cut.  The pencil marks show what we’ll keep.
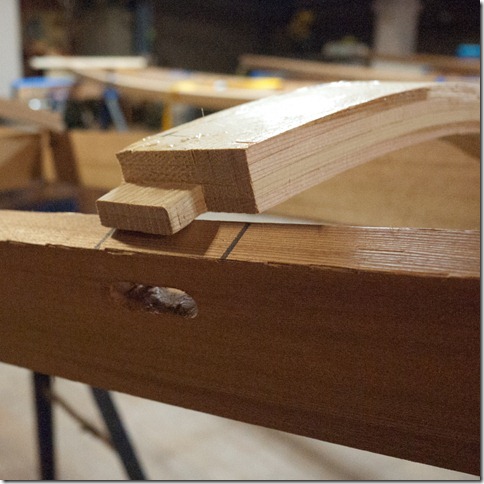
A cut tenon

This is a completed tenon and the mortise that it will fit into.  We cut the tenons using a Japanese saw and a chisel.  It took a few tries to get a tight fit.
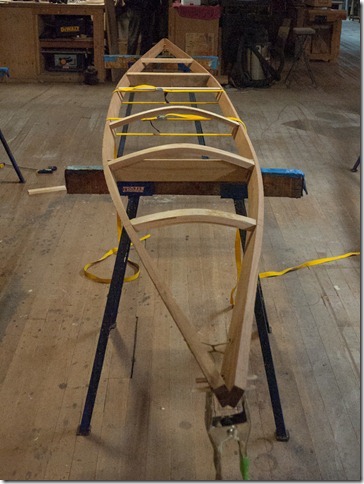
The top of the kayak is formed, each tenon is in place

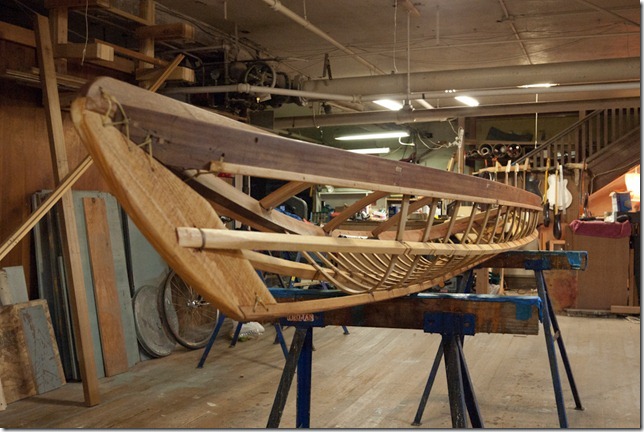
Here you can see all 6 of the deck beams on the boat.  The front 3 ones are curved (they were laminated together by Brian before the class) and the three rear ones are flat.  At this point the shape of the boat is set, so we were able to remove the jigs.
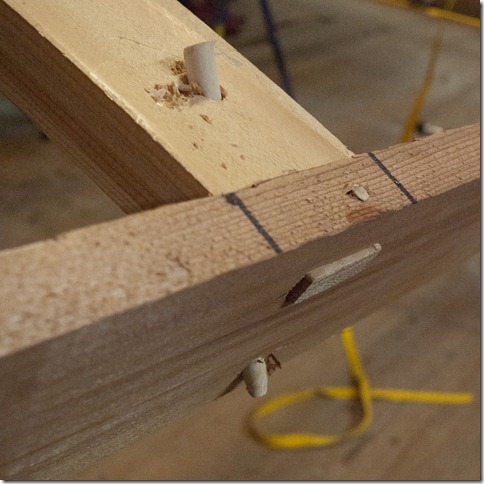
There are two pegs holding each deck rail in place.  A 1/8" through the top, and a 1/4" on a diagonal.  This is a strong joint (and no glue).

The tenons were pinned into place with 1/4” dowels at a diagonal, and a small 1/8” dowel through the top.  No glue was necessary.  All of the excess material was cleaned up later.
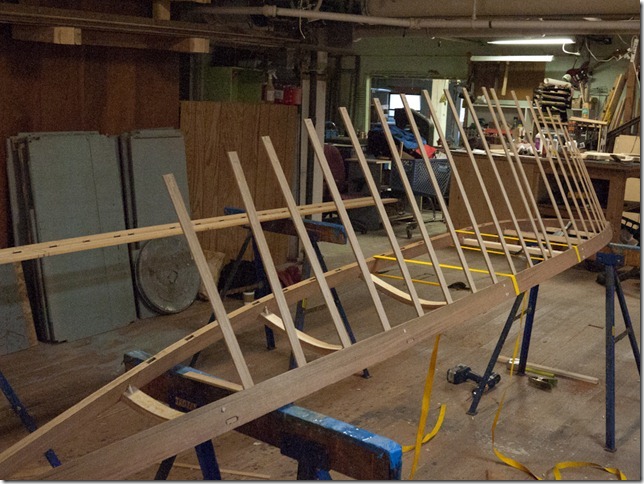
End of the day: The top is forms, all ribs are cut.  Tomorrow we'll bend them.

As our last job on day 1 we measured and cut the ribs that will form the bottom shape of the boat.  Brian scaled the rib lengths on the F1 kayaks based on the intended boats use.  In particular the small woman’s kayak used much shorter ribs to get reduced volume.

Day 2
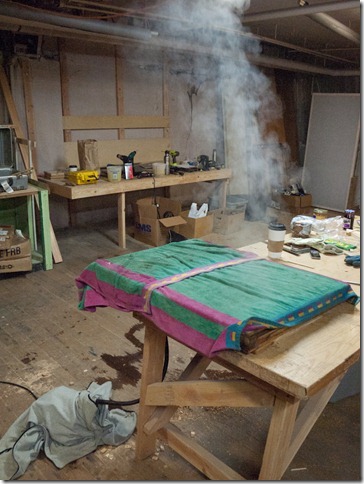
Steaming the ribs

We started day 2 by steaming the ribs.  We did this in a steam box that Brian had built, it was fed by a wall paper steamer.  The steam box held 20 ribs, and the ribs needed 20 minutes each of steam to become pliable.  This meant that we worked on a new rib every minute.  Brian used laminated bamboo for the ribs.  He used to use white oak, but says that good quality bending oak is getting very hard to find.  An alternative would be to use ash.
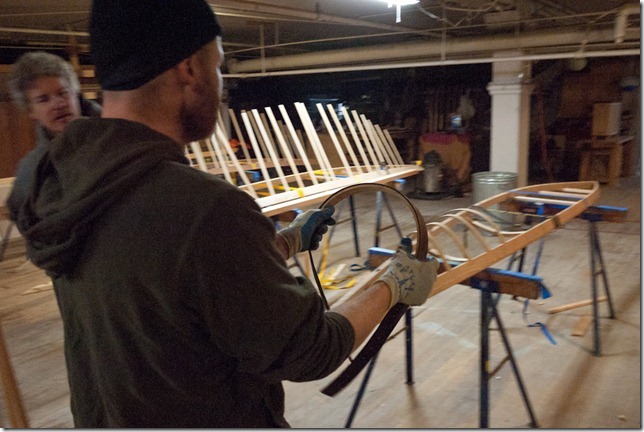
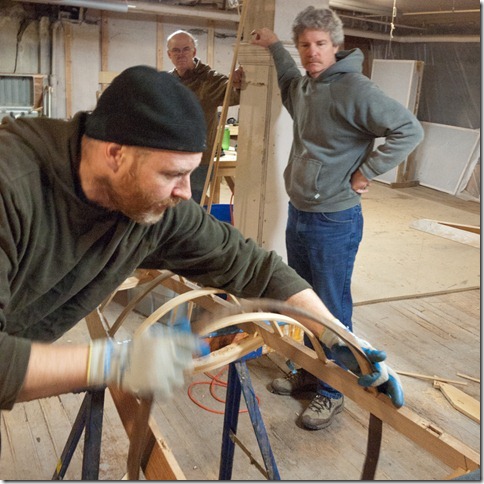
Bending the ribs

Here Brian demonstrates how we work the ribs.  Each rib was pulled from the steam box and backed by a thick leather belt.  The rib had to be worked immediately to make it plastic.
Bending the ribs

The ribs were then placed into the correct mortise on the gunwales.  There could be some extensive bending of ribs to make them meet the desired bend.  Not all of the ribs made it, we had to keep track of the broken ones and make new ones that would fit.
P1000204

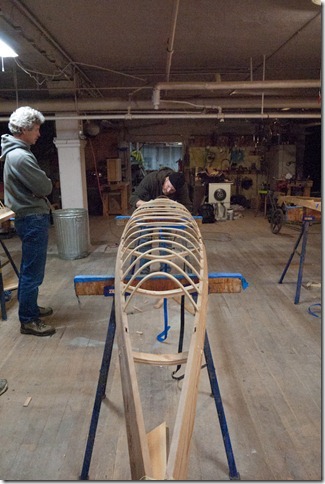
Here Brian is bending one of the last ribs in the boat.  You can really see how the bottom is taking shape.  The front few ribs are almost a V, then they are rounded over, and finally the rear ribs are squared off.

Getting the ribs right was probably one of the hardest parts of building the frame. 
Lashing

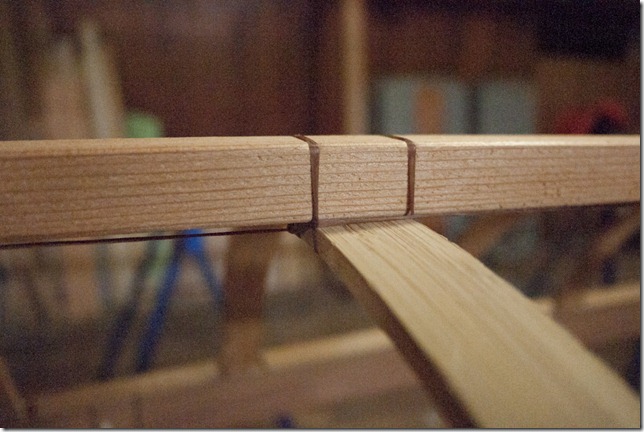
The next job was to tie a keel down to the center line of the ribs.  The keel was lashed in place with artificial sinew.  The knot above is called a box lash.
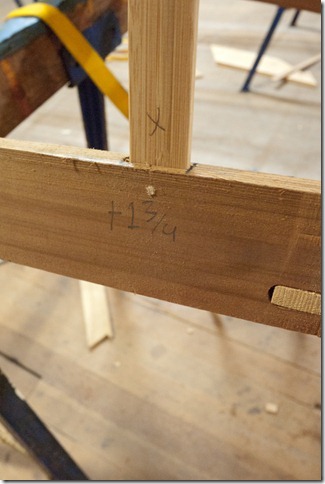
That number is how you measure the length of the rib.  Lay it across the boat, add 6", then the number

Some of the ribs were also pinned in place with 1/8” dowels.
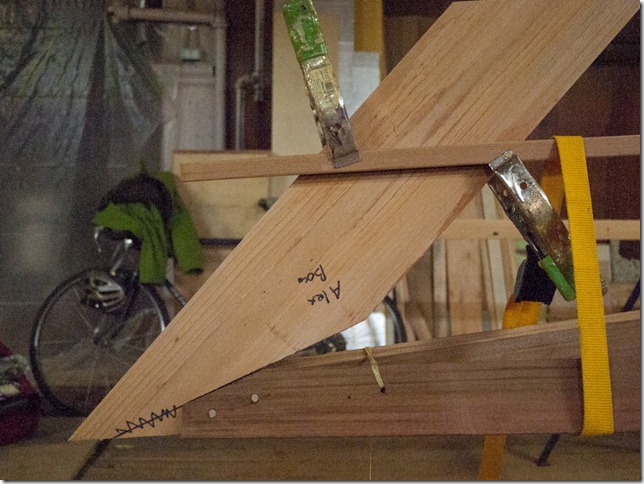
Marking out the bow stem

The next thing was to cut and install the bow and stern stems.  These define the front and rear of the boat, and many parts of the frame tie into them.  Here I am marking out the cuts that will need to be made.
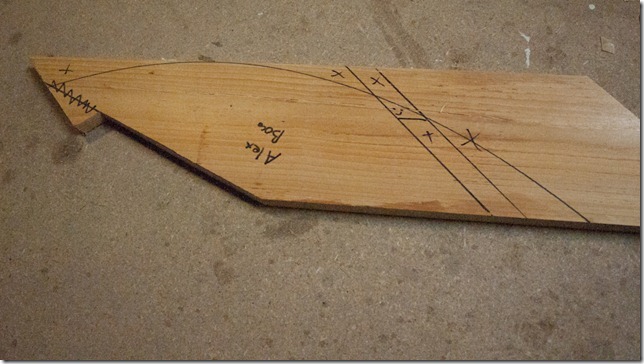
The bow stem is marked.

We took the marked up stems to the bandsaw and cut them from the template above into the proper shape.
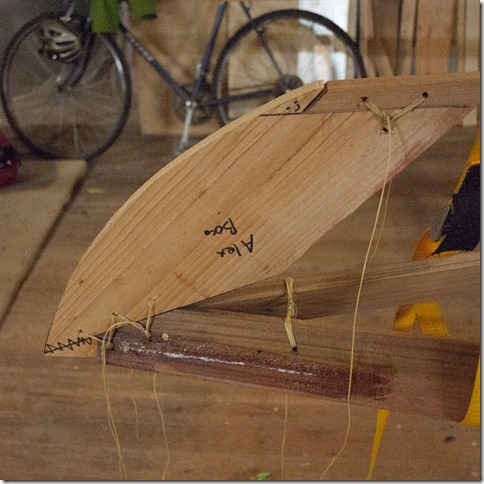
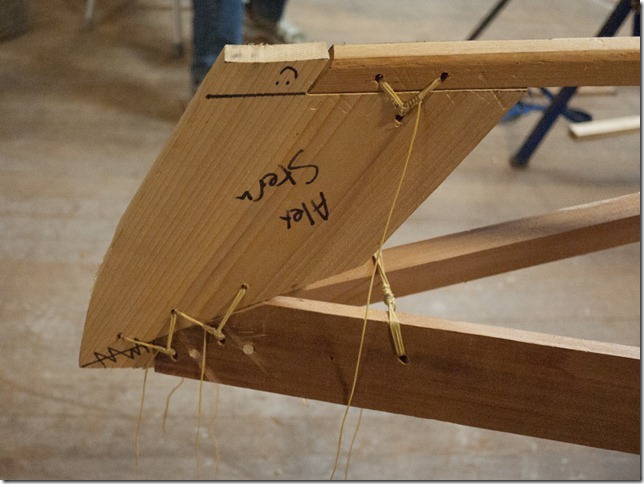
The cut bow stem is tied into the frame

Similar treatment on the stern

The stems were then lashed into the gunwales and the keel strip.
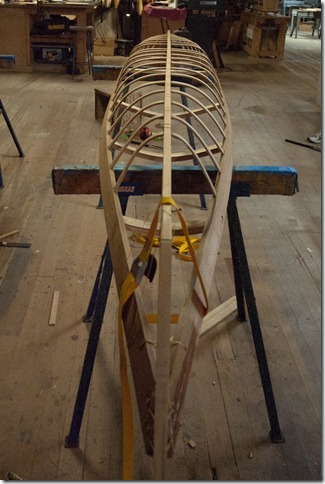
Keel strip, bow, and stern in place

This is what the boat looked like with the front and rear stems and the keel in place.
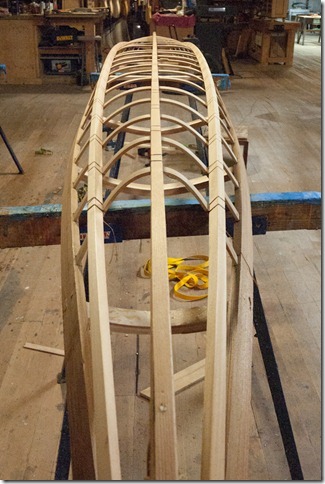
Stringers lashed into place

After adding the keel we added in two chine strips.  This formed the rest of the bottom of the boat.  It was important that all three of these strips were well aligned to make sure that the boat would track straight.
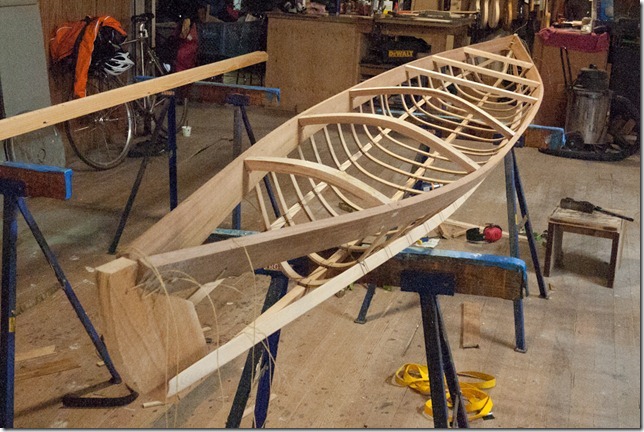
End of day 2.  It's looking like a boat!

This is what the boat looked like with the top facing up.  It looks like a boat, doesn’t it?

Day 3

The third day was about finishing up all of the frame work.  I thought we were almost done on Day 2, but there were a lot of bits to add on to build the boat’s shape.
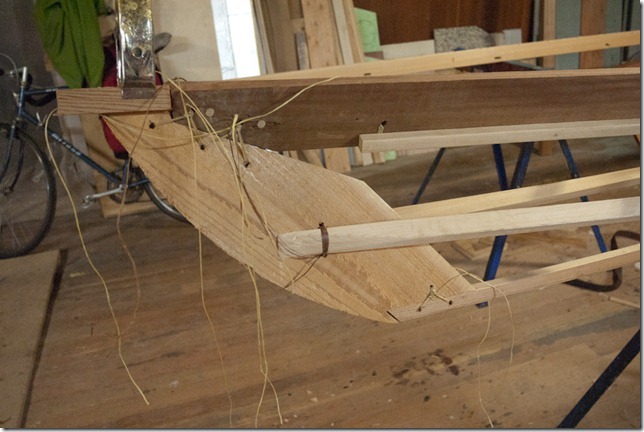
Bow stem, morning of day 3

The first thing was to tie the chine stringers into the front and rear stems.  The number of lashings is really adding up!
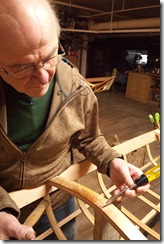
David carves out a notch for the top railCarving

We had to chisel out a small area for the top deck beam to sit in. 
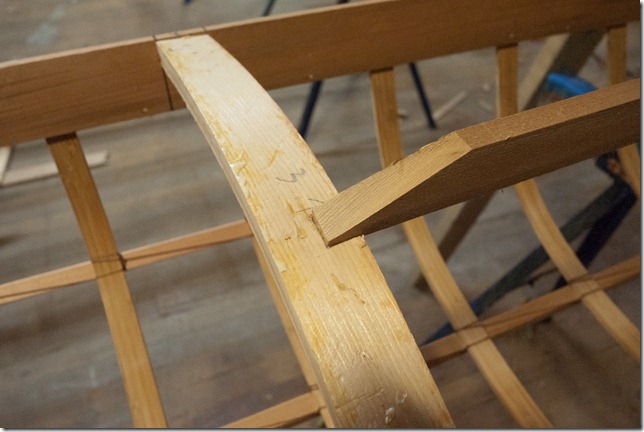
Carved

That is the back of the beam that defines the top edge of the boat.
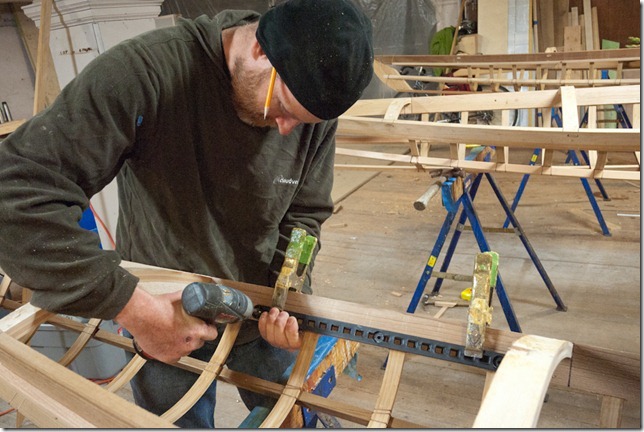
Installing foot pegs

Before putting that beam in we installed the tracks for the foot pedals.  With 4 screws per pedal track they won’t be going anywhere.
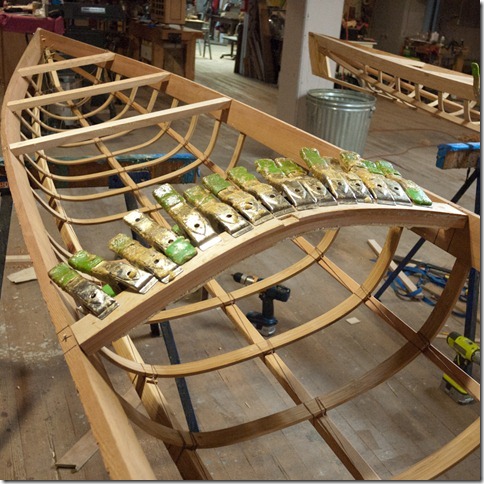
Adding a lamination for extra strength

On my boat and David’s boat we also added an extra lamination to the deck beam that will be right in front of the cockpit.  Brian said that this isn’t necessary, but it gave me a little piece of mind for very little actual weight.
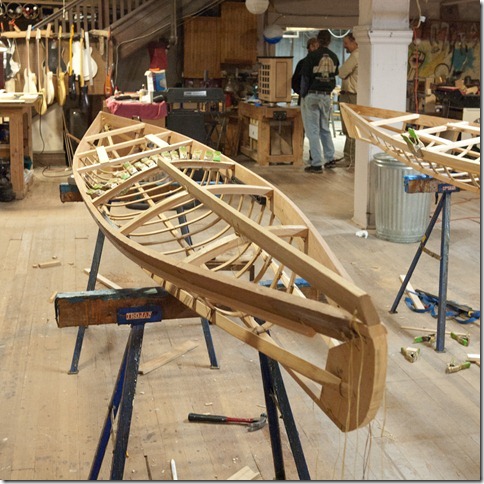
Progress middle of day 3

The bow deck beam was lashed into place.  We also added two stern deck beams that go just behind the cockpit.  They can support your weight when getting into the boat.
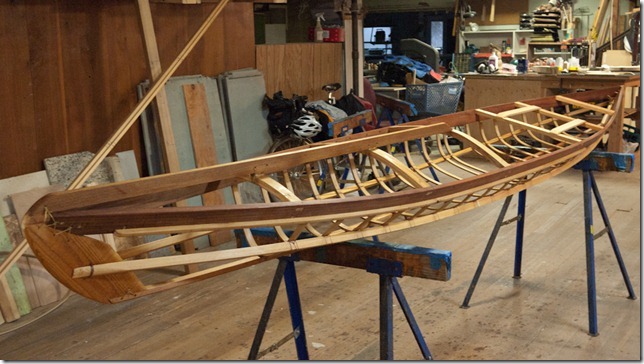
End of day 3.  The frame is done and has been oiled

Front, end of day 3

We finished the day by sanding the boat, cleaning up all protrusions, and then oiling the boat. 
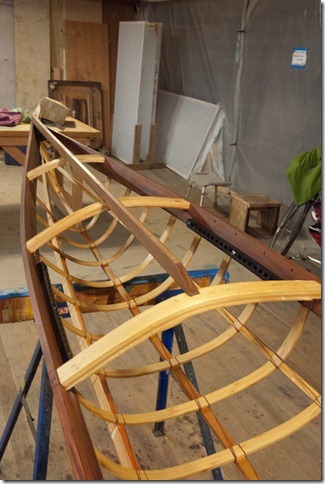
Front, end of day 3

The oil that we used (Watco) really made the colors on the wood on my boat pop. 

Day 4

On Day 4 we moved from building the frame to covering it with cloth.  This was the longest day of class, we started at 7am and I don’t think that I got back to my friend’s house until 8 or 8:30pm.
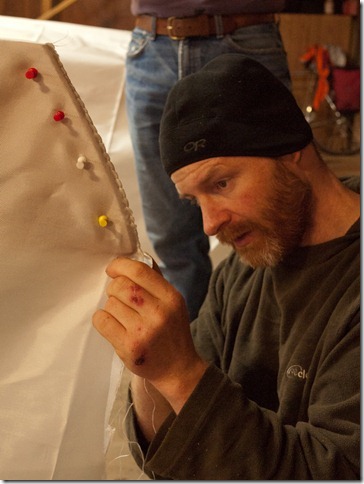
Finishing the stern.  We sewed just about an inch along the top so that we could hook this back over the end of the boat when tensioning

The first job was to cover the boat in nylon, then sew down the stern and 1” along the top of the boat.  That is Brian, our instructor, giving us a hand’s on lesson.  In general he taught by showing us what to do on the boat that he was building, then letting us work on our own boats.  The class all moved together in sync, rather than letting one person get far ahead or behind.
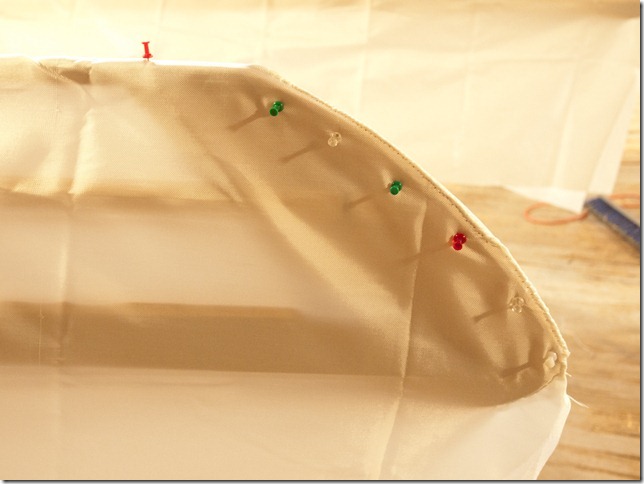
The front is sewn.  We moved the fabric forward about 2 inches on the boat before sewing the front.

The skin was shifted about 3” forward, then we did the same thing on the bow.
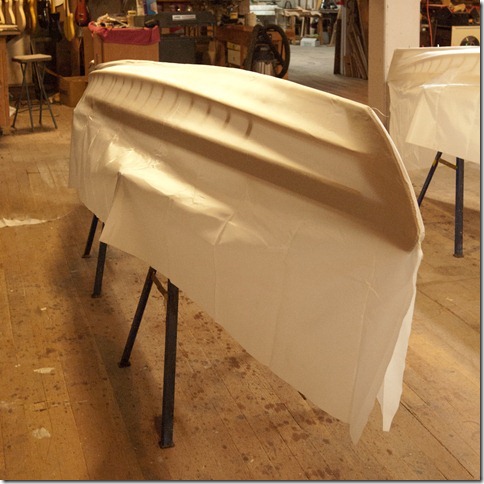
The boat is starting to get some form with this tensioning

Then the whole skin was hooked over the rear of the boat, pulling it tight. 
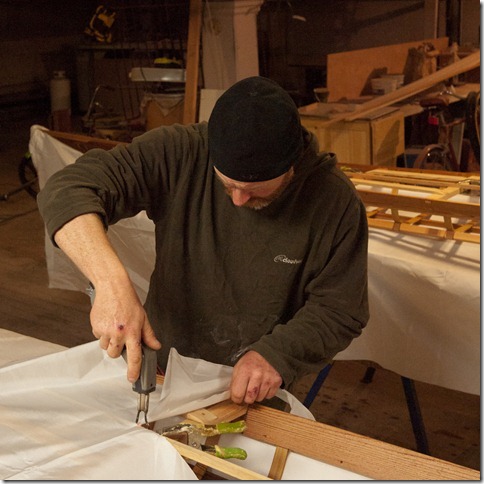
Brian cut the fabric along the centerlines using a hot knife

We clamped on some temporary centerlines and Brian used them as guides to cut the nylon skin.
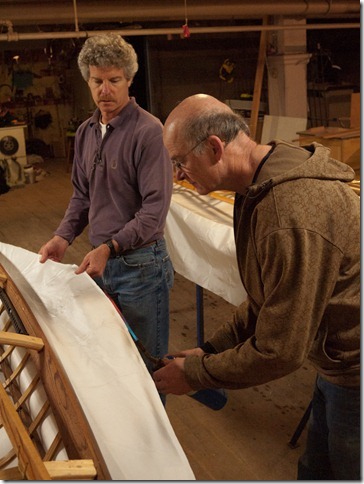
Dave and Steve sealed the edges of the fabric with a torch.

Steve and David followed behind with a torch and seared the edges, making sure that they didn’t unravel.
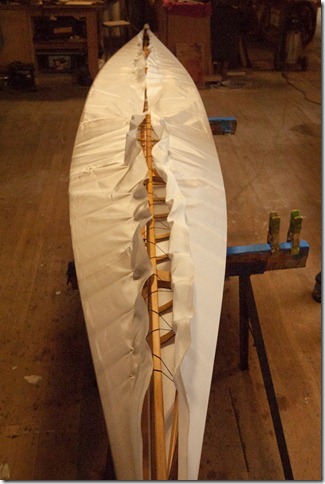
We used very heavy black thread to tension the skin.  The fabric was wet during this process (all the way up until we added the coming)

We used heavy black thread to tension the fabric along the front and rear of the boat.  With multiple passes of pulling on the black thread we were able to tension the skin around the frame.
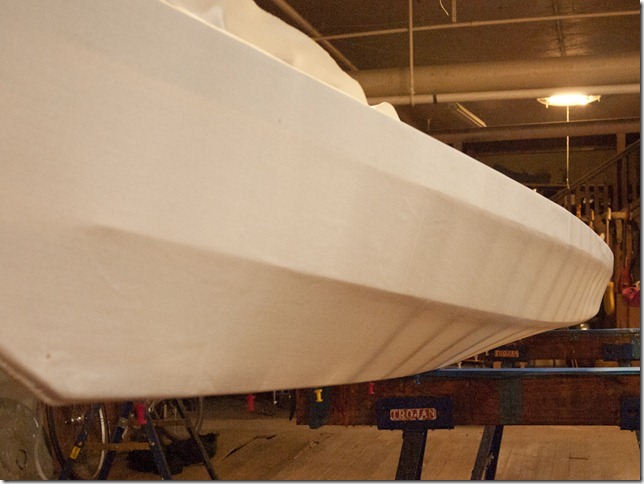
It is starting to tension

You can see how the fabric is tightly pulled against the framework of the boat.
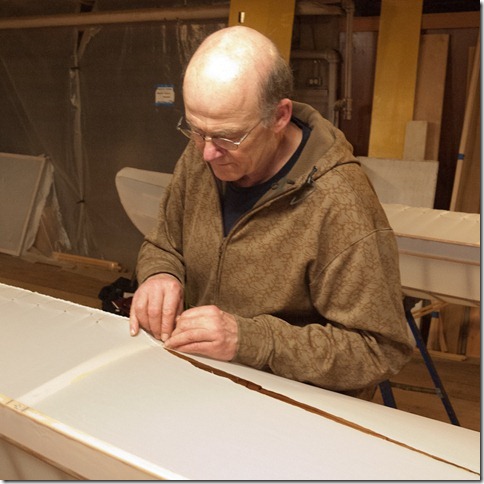
Dave is sewing the bow of his boat

We followed behind and sewed the remaining skin closed with white thread (actually dental floss).  This took a very long time, the seams on our boats are about 12’ long!
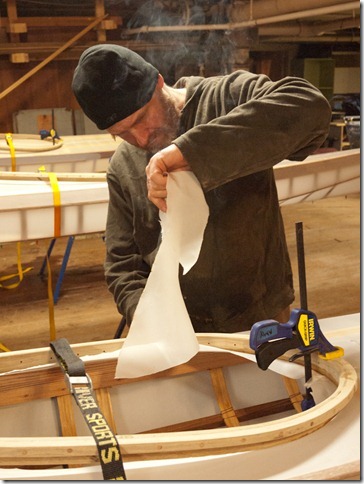
We've clamped the comings in place and Brian cut out the excess fabric with the hot knife

We located the coamings on the boat (Brian had made these previously at his workshop) and cut out the remaining fabric with a hot knife.  I don’t have any photos of sewing the coaming, but it was done with the same heavy black thread that was used for tensioning the skin.  We drilled about 50 holes around the edge of the coaming for the thread to go through.
Starting to sew the coming into place.  We used the same heavy black thread and ran it through little holes all the way around

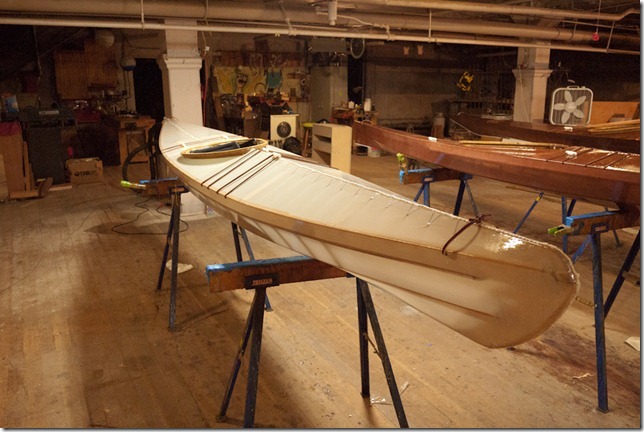
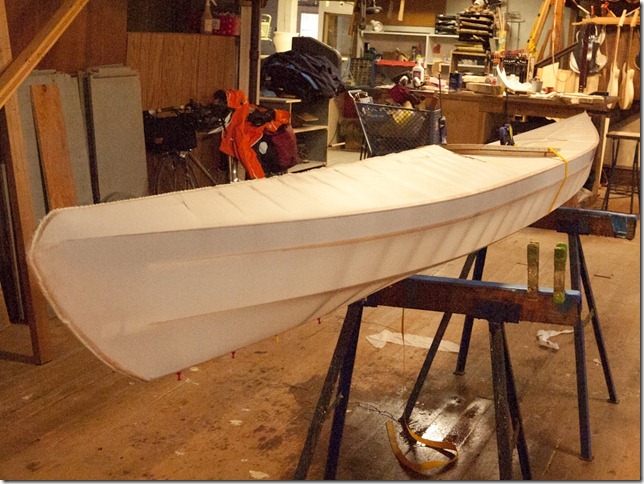
The boat is sewn up!

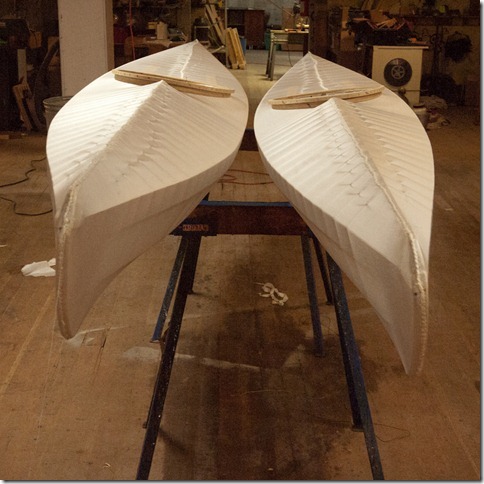
Two F1's side by side.  The small one on the right is for a 100lb woman, the much larger volume one on the left is for a guy with a lot of camping gear

Here you can see how a small F1 and a large F1 compare.  The basic shape is very similar, but the one on the right has a lot less volume.
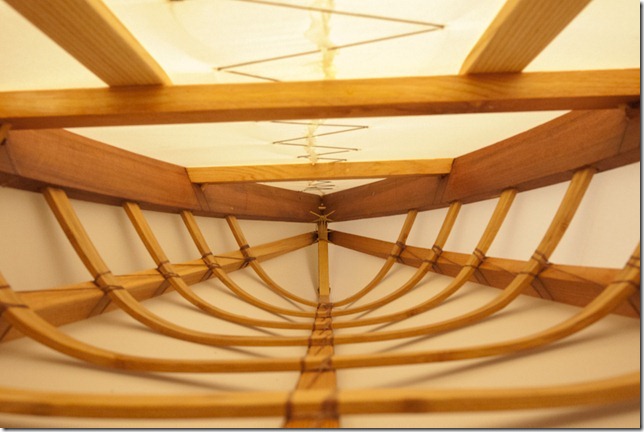
My boat, from the inside, fully tensioned

This is the inside of the stern of my boat and shows how the skin fits tightly around the boat’s framework.
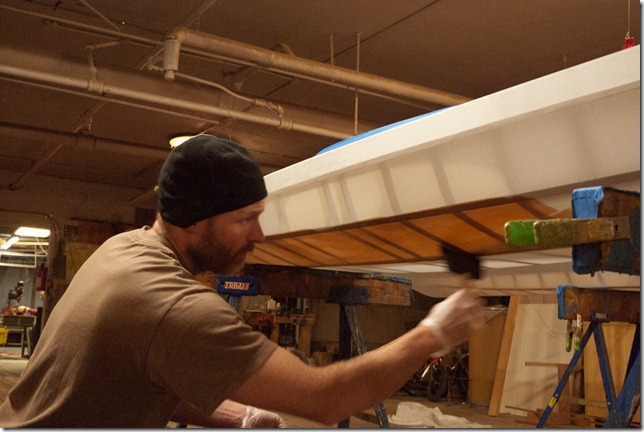
Dying the fabric using an acid based dye.  We started at the bottom and worked our way up.

We finished out the day by staining the fabric with a brown dye, working from the bottom to the top.

Day 5

On Day 5 we had to coat the fabric to make it waterproof.  We used a 2-part polyurethane designed for this that is made by Spirit Line and sold by skinboats.com.
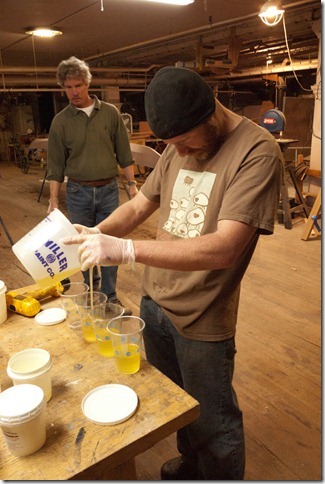
Mixing up the goop (Spirit Line)

Brian mixed up the poly (aka goop) for us.  I don’t have any photos of the goop application process (my hands were covered in it), but this is what it looked like when we were done:
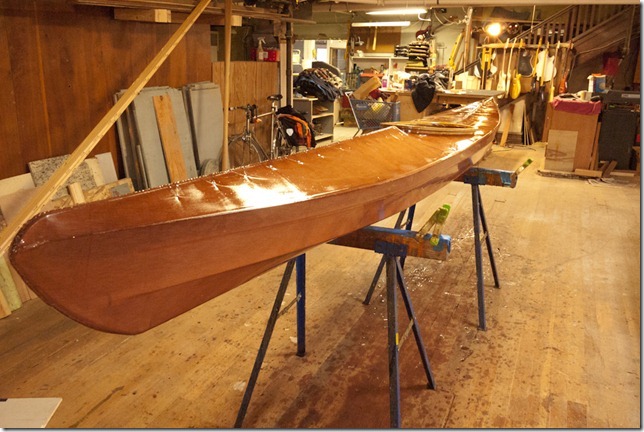
After coating

The goop was applied with a wide spreader and worked into the cloth in two coats.  We had to keep working it into the fabric and keeping an even application for about 45 minutes per coat.  We did the bottom of the boat first (with the top edged masked off), then turned the boat over and did the top.  The whole process took over 3 hours.

We used the other half of the day to make kayak paddles.  I will post a different (and shorter) photo essay on that process later.

Day 6

Day 6 was our last day in the workshop and was a short day to equip our boat for use.  We added deck lines, installed a back band, foam paddling to sit on, and put the foot pedals on their tracks.  The deck lashings are made of leather and took the most time.

Sadly I forgot to take my camera into class on Day 6, so I just have photos of the final product:
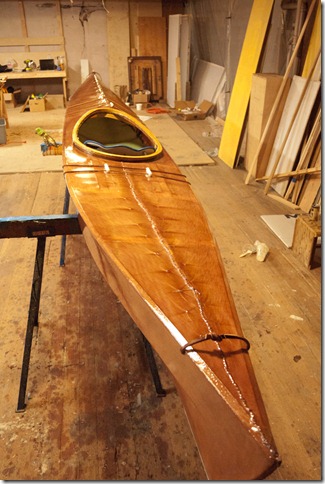
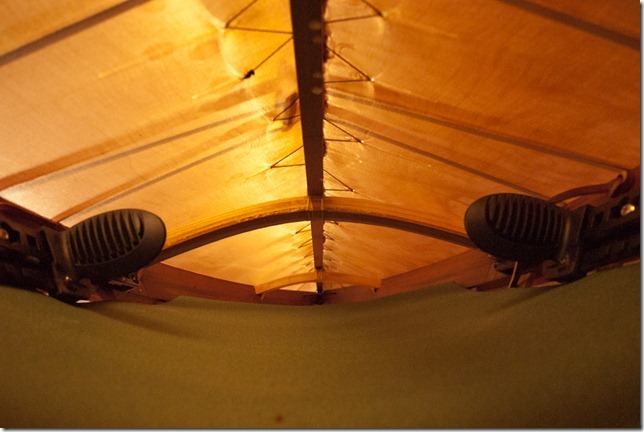
P1000385

P1000383

P1000386

David didn’t stain his boat, so it came out in a translucent white.  It will yellow slightly with age.

Day 7

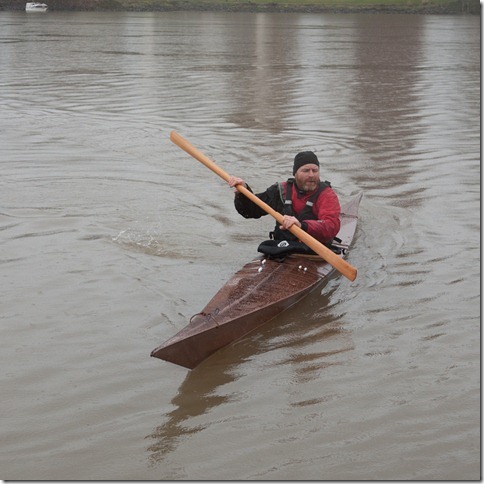
All that we had to do on day 7 was take the boats out for a quick paddle.My boat and Maxine’s boat next to each other, ready to go.  You can also see the paddle that I made attached to my boat.

Note: Brian provides much nicer looking back bands than the ugly blue and grey one that I used.  I just chose to recycle on that I already had rather than buying a new one.
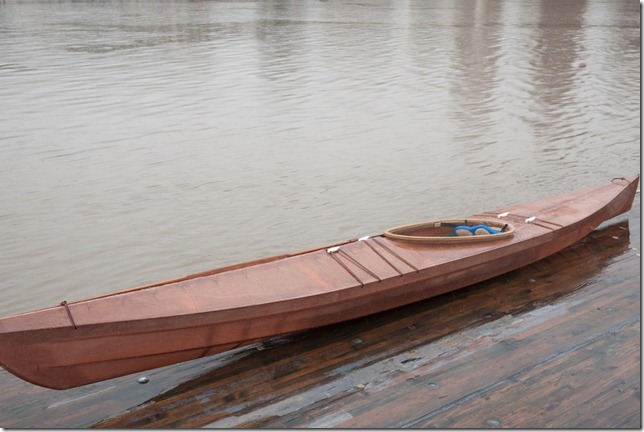
P1000432

My boat about ready to go into the water.
P1000431

Brian showed us some techniques for using the Greenland-style paddle in Steve’s Greenland-style boat.

Conclusion

I really enjoyed the class.  I’ve only had time to take the kayak out for one brief paddle so far, but it handled very well and I love the light weight of the boat.  It is about half the weight of my fiberglass kayak.

If I build another one of these (say for Christine) I know that I could do it on my own time, but I’d be tempted to take the class again.  It was fun working on the project with other builders and Brian’s experience and techniques allowed us to finish the build quickly without taking short cuts.

Full photo set is on my Smugmug Account: http://alexandchristine.smugmug.com/Kayaking/Building-the-Cape-Falcon-F1/16109665_PRQ3Q

New MTB

I built this up just in time for a late snow in Seattle:

My new mountain bike: Kona Explosif, Rockshox Reba SL fork, Rohloff, BB7 Disks (click for more images and closeups)

I found many of the parts (frame, fork, front wheel, disk brakes) at the Seattle Bike Swap for very good prices (under $300 total).  The frame called out to me immediately since it has sliding dropouts that work well with my Rohloff hub and nice steel tubing (TT Platinum OX).  The fork was never used and cost about 1/4 of it’s original price (thanks to Andre for finding that one).  The front wheel is the stupidest front wheel that I own: Shimano XT with aluminum nipples and straight spokes, but it was cheap, also new, and had the disk mount that I needed to work with this fork.

I’ve enjoyed more mountain biking in the last year and expect to get a lot of use out of this bike.  It’s a size larger than my previous Rocky Mountain.  I think I’ll prefer that, the top tube is much longer (over an inch longer) so I’m running a short stem and won’t be hanging way out over the front wheel.

This buildup was really quick and I took a lot of short cuts that involved zip ties, but I doubt that I’ll really change it anytime soon (except for removing the studded tires and going back to normal knobbies).

Also, if your only rear disk wheel is 700C and you really need to build up a MTB quick, you can run it:

700C rear, 26" front

It looks stupid, but worked fine and got me to work and back on a day when snow and ice were in the forecast.  I swapped the rim out for the 26″ one after a day.

Still building

I’ve been traveling a lot this fall and winter, but I now have a couple of months at home.  I’m back to work on the Ivy-T, building the fork.  A full photo essay of the fork build is coming, but here is a teaser shot of the fork’s dropout in an almost finished state.

Homemade dropout, using Keith Anderson TOTO insert

Norway in December

Christine and I just returned from a 10 day trip to Norway.  December obviously isn’t the normal time to go to Norway as a tourist, but I had a week’s worth of meetings for my job scheduled in Oslo.  We took advantage of the fact that I’d already be over there and stayed for an extra 4 days to do a little exploration.

We spent most of our time in Oslo.  I had meetings during most of the daylight hours, but Christine took advantage of any sunlight (only about 5 hours a day) and explored the city.  We were both impressed by the quantity and quality of museums.  Our favorite museums were the Munch Museum, which celebrates the work of Norwegian artist Edward Munch and the city hall which is covered with interesting artwork on the interior.  Christine also really liked the Folk Heritage Museum (I didn’t go) which had a lot of classic Norwegian buildings, including a really elegant wooden stave church.

Oslo is a great city to walk around.  Everything was very accessible via public transit or foot and the city core is compact and vibrant.  The shopping areas generally had pedestrian only streets which were full of people day and night.  Sadly the exchange rate isn’t very favorable, so we didn’t buy much of anything there (most items were 2-3x the US price).  We were there in the middle of winter, but I saw a number of bike commuters (all using studded tires of course) and there were bikes locked up everywhere.

Oslo Palace

View of the Train Station from our Hotel Room

Oslo Sculpture Garden

Oslo Sculpture Garden

Oslo City Hall

Details from the Stave Church at the Heritage Museum (photo by Christine)

Fram Museum, Oslo (photo by Christine)

On Sunday we headed west on the Oslo to Bergen train.  Our destination was Flåm , a tiny little town on the fjords and the middle of a tourist route called “Norway in Nutshell”.  To get there you take a 4 1/2 hour train ride to Myrdal (a town that is mostly a train interchange) and then take a train called the Flåmsbana that goes through kilometers of hand-dug tunnels and down the face of a mountain to get into the Flåm valley.  It drops about 1000 meters along the way and has beautiful views the whole way down.  It is pretty incredible that they were able to build it at all, and more amazing that they built it mostly by hand in the 1920s.

Flåm is a pretty busy tourist town in the summer, but at this time of year only one hotel was open and everything shut down by 6pm (restaurants included, so we ate a late lunch).  The hotel made up for it by being attached to a microbrewery that made west coast US-style beer (a nice change from the pilsners found elsewhere) and having plenty of that on hand.  They also gave us one of the best rooms, with nice views out onto the fjord.

On our second day in Flåm we took a bus over to Gudvangen, and then took the ferry from Gudvangen back to Flåm.  The two towns are linked by very dramatic fjords.  It was -15C outside, but we still spent a good portion of the trip on the deck of the ferry just enjoying the views (followed by brief intermissions back into the cabin to warm up).  The pacific northwest is blessed with great scenery, but nothing that compares to what we saw from the ferry.

I noticed little roads cut into the mountains along these fjords from the ferry and really started to get excited about doing some cycling here one day in the future.  I need to look into the logistics, but I think I could take my bike from Oslo to Myrdal on the train, then do a few day route through the fjords, probably linking them up by ferries.  Hopefully my next trip there will be in the summer or early fall.

View from the Flamsbana Railroad

The Gudvangen to Flam ferry

View from the ferry

A frozen waterfall

Undredal, Norway

The two of us trying to stay warm in -15C weather on the ferry

Sunset (at 3:45pm) from our hotel room

Flamsbana Railroad

Sunrise (at 10:15) from the train back to Oslo

Wooden railroad bike, used when building the Flamsbana

more photos

Tried and Liked 2010

Tried and liked is an Internet-BOB list tradition for the last few years where community members post about products that they’ve tried and liked over the last year.

I haven’t bought many actual bike products this year, so my entry is going to be heavily clothing related.

Riding Gifford, Wearing Mountain Hardware Knickers, on a Rough Stuff ride. This photo covers a lot of what was great this year.

Sorry that this entry is text dense and photo light.  I’m writing it at 5am in Oslo, Norway, and haven’t had a chance to go find photos.  I’ll write more about Oslo soon.

Riding a bike that I made

A year ago at this time I had just finished building Gifford, the first bike that I made from scratch.

A year later I’ve ridden almost nothing else.  For the last 6 months I haven’t even owned another road bike (I do have a mountain bike, folding bike, and tandem…and a road bike on the way).  I look forward to having a lighter and zippier bike back in the stable, but I know that if I were to drop down to one bike which one it would be.

I’ve had this bike for a year and thousands of miles and I don’t think I’d make any changes.  I can’t say that for any other bike that I’ve ever owned.  It also feels great knowing that I made it, and knowing every little detail of how that was done.

REI/Novara Verita Cycling Jacket

I haven’t had a real bike rain jacket in years.  You might ask how that is possible in Seattle?  I’d use my favorite Ibex Breakaway when it was misty (most of the time) and the paper-like O2RainWear jacket when it was really dumping.  The O2 jacket won on low price ($40ish) and it’s light weight and easy packing.  It breathed as well as anything else that I had tried.  I just got sick of patching up the jacket, or disposing of them every couple of years.

I was at REI looking at expensive jackets from Gore and Shower’s Pass when I found this one from REI.  It is cut a lot like that papery O2 jacket: tight enough so that it doesn’t flap around, loose enough to wear a heavier Merino sweater under it, long enough in the tail.  It is made of a much more durable fabric and breathes even better.  It adds a rear pocket and lots of reflective piping that really works well in the dark.  The orange color is an attention getter too.

This jacket (and the O2 one) have no ventilation at all.  No pit zips, no back zippers, nothing.  10 years ago I was convinced that ventilation was the key, but the newer fabrics seem to do pretty well without it.  I like how much lighter the jackets are without all of that stuff too.

Alite Monarch Camping Chair

I actually bought this in 2009, hopefully I didn’t put it on last year’s tried and liked.  I think I only used it once last year, but I spent many evenings sitting in my Alite chair this year.

This is a very comfortable chair that weighs under a pound and packs down pretty small.  I had it on most of my kayak, car, and bike camping trips this year.  It is much more comfortable for me than the normal L shaped foam chair and packs smaller.

This chair isn’t for everyone.  It only has 2 legs, you need to be comfortable leaning back and using your legs as the front two legs for balance.  I sit that way on 4 legged chairs, so it works well for me.  It is also made pretty borderline light, so I think the 200lb weight limit is a serious one.  I see many of them in the returned area at REI (which can be good if you want a discounted one).

MyFitnessPal

Early this fall I weighed myself and for the first time in my life my weight rounded to 200lbs.  That kind of freaked me out and I decided to get serious about losing weight.

MyFitnessPal is one of many great applications that make it very simple to count calories using your smart phone (they have versions for Android and iPhone).  At first I just ate as I always did during a normal week, but took good notes using MyFitnessPal to keep track of how much I was eating.  Then I spent 3 weeks being very serious about logging every calorie (even if I just had a brownie sample at the grocery store).  That was a very useful exercise and gave me a great mental model of what is high calorie and what isn’t.  I lost 10lbs in those three weeks.

I’ve stopped using this tool on a regular basis, but I’ve still lost another 5lbs just by being a bit smarter about what I put in my body.  During the same time I’ve been biking less (mostly due to excessive travel), so I should be in worse cycling shape.  However when I do get on the bike I feel faster.  I look forward to seeing how this really pays off in the spring (when I’ll hopefully be back at my “good” weight of around 175lbs).

Rough Stuff Cycling

This isn’t new to me, but 2010 is the year that I concentrated on it.  I love riding the logging roads in the Pacific Northwest.  Once I’ve spent my cycling days having days of tough climbs, fast descents, and great views it is really hard to do anything else.  A brief recap of 2010: Jack Pass, CdA NF in June, Kachess Ridge in August, CdA NF in September, Stampede Pass in October.

I never got into mountain biking because I had a hard time handling all day very technical rides, and didn’t like driving my car long distances to ride my bike shorter distances.  The rough stuff rides are less punishing, so I can manage a 50 or 70 mile day without feeling dead.  That lets me keep the bike to car time in check.

One of these rides per summer month feels about right, I hope I can keep up that pace next year.  I promise to do a better job of keeping the roughstuffnw.org blog going too.

Pacenti Quasi-Moto Tires

They are light.  They are fat.  They are knobby, but not too knobby.  I think they are the perfect dirt road tire.

CNC Machining

I really need to write a blog entry or two about my CNC adventures.

I bought a tiny little CNC milling machine in Feb 2010 for my birthday.  I can’t say that I’m 100% productive on it yet, but when it is working well it is a great little machine.  It is a lot of fun drawing something on the computer, pressing go, and seeing it get created.  Here are some dropout prototypes that I recently made on it (the really shiny bits came from Keith Anderson Cycles, I made the dull bits):

Custom dropouts, CNC'd in my basement

Ibex in, Icebreaker out for Merino Wool Shirts

For most of the last decade I’ve had an Icebreaker T-shirt on as my base layer.  I first bought Icebreaker clothing on a trip to New Zealand in 2000, and came home with tons of it on a trip in 2002.  They really introduced me to lightweight wool T-shirts that are comfortable in all conditions.

About 3 years ago Icebreaker moved their production from New Zealand to China.  Quality seems to have gone down for me, and the price did not.  Icebreaker representatives at the factory store in Portland claim that no country but China can sew the lightweight material, but Ibex proves them wrong by making even lighter shirts and having them sewn in the US.

This year I haven’t bought too many wool shirts, but whatever I have bought has been from Ibex.  It’ll stay that way in 2011.

Mountain Hardware Pants — Good and Bad

For the last 6 years I’ve mostly worn one pair of shorts.  They are made by Mountain Hardware and are a tough synthetic canvas that still doesn’t show any signs of wear.  They have an integrated belt which has let me adjust them to fit me over the ~20lb weight swing that I’ve had in that time.  I wish I’d bought 2 or 3 pairs, I’d never need to buy other shorts again.

Last winter I bought a pair of Mountain Hardware 3/4 Ridgetop pants which are sold as climbing pants.   To me they looked like cycling knickers.  The price was half the price of most cycling knickers, so I gave them a try.  They are great, the fabric feels really good and they fit great.  They have nice little details like a keyholder in the left pocket, deep pockets that don’t drop things, and an adjustable belt just like the one on those shorts that I like so much.

I needed some new cycling/hiking/biking pants last spring and decided to check out all of Mountain Hardware’s offerings since I liked those shorts and knickers so much.  Here is what I found at that time:

  • Piero Pants — These are 95% of the way there, but don’t quite make the cut.  The waist is stretchy and there is no integrated belt.  Out of the washer they fit nicely, 3 days later they’d be falling down my waist.  The pockets were really shallow, so I kept losing my cell phone when I’d sit in chairs.  They have the magic heavy canvas of those old shorts, but the details are all wrong.
  • Matterhorn Convertible — The fit wasn’t the same as other MH pants, they didn’t work for me.
  • Mesa Pant — The online copy makes it sound like these use the same fabric as the Piero pant, but they don’t.

Mountain Hardware has since killed off the Ridgetop 3/4 pant.  If you can find them at a closeout place (Sierra Trading Post or the like) scoop them up now while you can.  I bought a second pair.  They’ve replaced them with the Ridgetop pant, which are the same thing in full length.  I got a pair of those and they are good, but I still wish for them in the tough fabric of the Piero pant.

They don’t make shorts with that fabric.

When Mountain Hardware makes something well they really do a knock out job.  Stock up then, because they won’t make it nearly that nice for many years.

Philadelphia

Fall Colors, Valley Green

 I grew up in Philadelphia, and used last weekend’s Philadelphia Bike Expo as an reason to fly home, visit family, and hang out with other bike nerds.

The show was great.  The name is very similar to the local Seattle Bike Expo, but the show felt very different since a primary organizer was the custom bicycle builder Bilenky Cycles.  The show had the normal mix of local bike shops, bike clubs, and organizations that fill the Seattle Bike Expo, but around half of the exhibitors were other custom builders where the Seattle Bike Expo might have 3 or 4 custom frame shops.

I didn’t take too many photos at the show, but I did talk to a lot of the builders.  A few memorable ones were Drew Guldalian from Engin Cycles, Peter Weigle, Doug Fattic, Ahren Rogers from Bano Bikes, and Jeremy Shlachter from Gallus Cycles.  Drew had a fun party in his shop on Friday Night and then a great booth with a photo backdrop from his shop at the show.  I enjoyed a talk that he gave on Saturday afternoon about his business model and why it was beneficial to build bicycles and have a bike shop as one business. 

Peter Weigle and I talked for about 15 minutes at his booth.  He must be one of the nicest guys in the business, and freely shares information and little tricks and tips with myself and anyone else that will ask.  I enjoyed his work at the show, which included two modified/restored mass produced bicycles from Raliegh and Motobecane, plus 3 of his own bikes.  Most framebuilders aren’t interested in that kind of work, but I’ve always found to appealing to make minor or major modifications to an existing bicycle to make it better.  I was sorry to miss his talk on restoring bicycles.

Doug Fattic showed me his frame fixture, which I didn’t take any photos of.  It is designed to allow one to design the bicycle frame on a flat surface in a way that would normally require CAD.  I enjoy drawing my bikes in CAD first, but can see why his approach makes a lot of sense for someone who is more tactile in nature.

Here are a few photos from the show.  Sorry about the general image quality, I just wasn’t taking many photos or being careful at this show.  Click on any of them to drop into the gallery with other photos.

A very nice mixte from Banjo Bicycles, with custom racks by "The Rack Lady". These racks are very ornate, but in a way that I find really appealing.

Front rack closeup

This Weigle frame was for sale at the show, but rumor had it that the bike was sold before the show even opened. The buyer is very lucky, it is a wonderful bike.

Peter Weigle explained to me that his centerpull brake bridges come down so far to add extra support for the back of the bosses. This really made sense since I had just installed similar bosses on my Ivy-T frame.

I usually don't get that excited about lugs or bilaminate construction, but got really excited about this bike from Johnny Cycles and the detail work on it.

Seat lug closeup from the Johnny Cycles bike.

I wish I rode mountain bikes enough to order one of these 953 lugged frames from Drew at Engin Cycles. There is a lot of work in making one, but they final result looks great.

The show was in center city, and on Saturday I was staying with my father who lives in Glenside, a suburb that is about 20 miles north.  Philadelphia has a great park called Fairmount Park (one of the largest in-city parks in the world).  More than half of the route to my dad’s house can be done on the trails inside the park.  During my summers in college I’d ride from center city to Glenside almost every weekend, but I hadn’t been on that ride in at least 15 years.  It was really nice to make the ride through Fairmount Park as the colors were peaking.  I realized how much I’ve forgotten of Philadelphia geography when I got lost in a few major points and had to resort to using my phone GPS to find my way.

The Bike Friday service department had just done a bunch of upgrade work on my Tikit frame before this trip.  I haven’t ridden it much in the last year, but this trip reminded me of how nice of a bike it really is, and I love having it when I go back to the east coast.

Riding through Fairmount Park on my Bike Friday

Later in the week I spent a few days at my brother’s house.  He and his wife are rehabbing a 100 year old house in Fishtown, a couple miles northeast of downtown.  I love going back and seeing the progress that they are making on their house, and how that neighborhood is changing.  When I was in high school Fishtown just wasn’t an area that I felt comfortable in, it was pretty run down and rough.  Now I visit Greg and Naomi about once a year, and every time that I go there are half a dozen new resturants and other local businesses that have opened within walking distance of their house.  It is great to see the area turning around while keeping the original houses and some of the original grit.

Greg and Naomi's fancy new kitchen tile, plus a couple of the many cabinets that Greg and I assembled for his kitchen. It'll look great when it is done.

I ended my trip with a walk through Valley Green with my mom and brother, and once again enjoyed the color.  What a great park!

New Blog Announcement

I’ve started a new blog called Rough Stuff Cycling Northwest for sharing routes and reviews of backroad rides in northwest US.  It will differ from this blog in that I’m inviting others to provide content to it as well.  The welcome entry goes into more detail.  If you’ve enjoyed my trip reports from rides in our National Forests then I’d recommend subscribing to that blog.  The first entry is about a ride that some friends and I did yesterday over Stampede and Tacoma Passes pretty close to Seattle.  If you’d like to contribute to the blog please let me know and I’ll make you an account.

Jan Heine has also started a new blog related to Bicycle Quarterly called Off the Beaten Path which should be interesting.  His first post talks about his ride on a backroads route between Seattle and Portland and I look forward to seeing what else comes.  I think that this will be a great addition to the print magazine.