Gear Review: Ostrich Handlebar Bag and Velo Orange Decaleur
Introduction
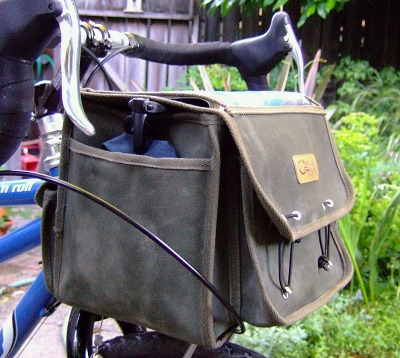
The Ostrich F104 is a French-style handlebar bag made of cotton duck. It is designed to mount to the handlebars, but have it’s weight supported from the bottom by a front rack. I’ve usedit with the Nitto Campee (sold by Rivendell as the Nitto Mini) and Nitto M12, but it would work with any front rack that has a top shelf. Normally the bag is secured to the handlebars with two leather straps, butVelo Orange makes a quick release device that will support the bag instead.
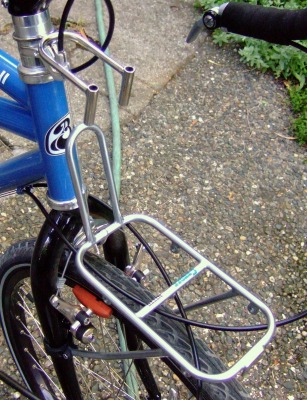
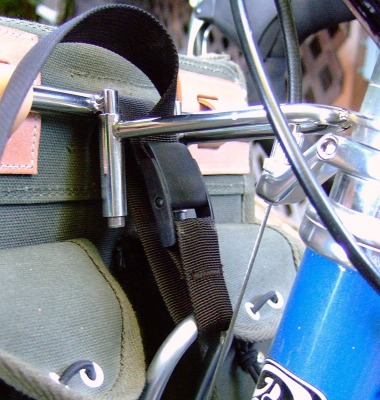
The front support rack and the bike-half of the Velo Orange Decaleur
This setup is quite different than most handlebar bags, but it has some big advantages. Most handlebar bags use a quick release clamp which mounts to the handlebars and which supports the entire load only from the bars. In comparison this bag is mounted lower on the front of the bike, which both improves handling and prevents the bag from blocking handlebar mounted accessories. The use of a front rack to support the load from the bottom allows for a heavier load than most bags can handle.
Bag Design and Use

The rear and side bag pockets
The handlebar bag is quite large with a capacity of almost 13 liters. It is almost a cube at 260mm (10 1/4″) wide, 220mm (8 2/3″) tall, and 200mm (8″) deep. There are 5 pockets in addition to the large main pocket. The front of the bag has a wide and tall pocket that is about an inch deep that is useful for keeping small but important items like your sunglasses. The rear of the bag has two small pockets. I found that my wallet and cell phone fit perfectly into one of them and carried a small digital camera in the other. There are two thin pockets on either side of the bag. I carry a home made rain cover in one and left the other empty. The front, rear, and main pockets all use elastic shock cord over a metal loop as a closure mechanism. This is secure and yet very easy to open with a single hand.
At the top of the bag there is a map pocket. The map pocket is completely open on each side (unlike my other handlebar bags) and has a 1cm grid on top which can be useful when making measurements on maps. I didn’t think I’d like the open sides and worried that my maps would shift or fly out while taking tight corners, but this has not been a problem. I don’t like the grid, in bright sunlight it projects grey lines onto the map which can look like roads. I often found myself removing the map from the case to read it while riding due to this issue.
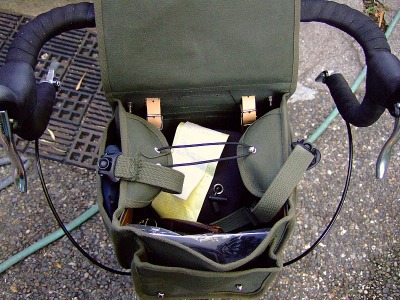
Top flap opened
One concern on the BOB and Kogswell lists is that the main flap on this bag opens backwards. The closure is on the front of the bag (facing away from the rider) instead of the back of the bag. I can reach the closure while riding to open the bag,but it requires more of a reach than other handlebar bags that I’ve used. On the other hand the elastic shock cord is easier to work with than the zippers or snaps on my other handlebar bags,so this makes up for having to reach farther. Once opened there isn’t really a downside to having the bag open the wrong way. I don’t ride brevets or other timed events, so I usually accessed the bag while I was stopped anyway. If I did need to access the bag while riding I would probably keep food and other fast access items in the side and rear pockets.
As I mentioned earlier this is a very large handlebar bag. At 12 liters ithas the same volume as one of my Ortlieb small front panniers. On my first ride with this bag I was able to fit a box of cereal, a large bag of musliex, a full change of clothes, my tools, and a bicycle lock. I do not have a problem carrying my normal commute load (change of clothes, maybe lunch, and tools) and usually have space left over (unfortunately it will not fit my laptop). While touring I could carry a many day food supply in it in addition to my wallet, phone, camera, sunglasses, passport, and book.
I used the handlebar bag exclusively with the Velo Orange Decaleur, but it came with straps for securing the bag directly to the handlebars and the top of the rack. The handlebar straps would only be useful if your rack to handlebar height matched that of this bag. I didn’t find the under the bag strap to be useful at all, it was turned the wrong way to work with my Nitto front racks and hard to reach to secure it anyway. I think it would be more useful if turned 90 degrees and located at the front edge of the bag instead of in the center.
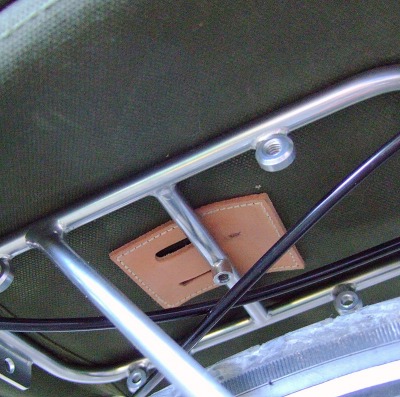
The loop under the bag is not well located and is oriented the wrong way to be useful
Stylistically I like the design of the bag. It has leather only where it provides function and is otherwise made of cotton duck. There are internal stiffener plates for the sides and bottom to maintain the bags shape, but they can easily be removed for packing.
Decaleur Use
The decaleur is an optional item, but should be purchased with this bag. It makes installing and removing the bag trivial. Instead of strapping it to your handlebars you just lower the bag onto the decaleur and front rack.
The decaleur consists of two parts, both made of stainless steel. The first part fits into your headset stack and consists of a U shaped piece of metal with two downward facing tubes. The second part mounts to the bag and has two prongs which face downwards and fit into the tubes on the bike portion of the decaleur. Each part is available seperately, so you can buy one of the bike parts for each bike that you own and one of the bag parts for each of your handlebar bags if you want to move things around easily. You do need to mount the decaleur at roughly the same height (within a cm or so) above the front rack on each of your bikes. These photos show the decaleur mounted on a bike with a 1 1/8″ threadless headset, but they also make the bike portion for 1″ threaded headsets.
For road riding the decaleur by itself is all that you need to secure the bag to the bike. Just align the bike and bag portions of the decaleur and drop the bag onto the rack. When you need to remove it (to go shopping for instance) you just lift the whole thing off of the rack and go on your way. It couldn’t get much easier. Over large bumps the bagmight bounce a little bit, but never high enough to clear the decaleur.
While touring on logging roads I found that it wasn’t quite secure enough. I hit a pothole while descending and the bag bounced off of the front rack and out of the decaleur. I found that a velcro strap between each part of the decaleur was enough to keep this from happening, but it made installing the bag take longer. It would be nice to see the decaleur redesigned to have a positive locking mechanism. An easy running change would be to use longer prongs on the bag part of the decaleur with a hole drilled across the bottom of them. A small pin or spring clipcould be installed the lock the bag to the bike. Hopefully Velo Orange considers doing this in a future production run.
Securing the Decaleur with a compression or velcro strap
Compared to a front basket
I’ve been using a Wald basket on the front of my bike prior to getting the Ostrich bag. A couple of cyclists have asked me how they compare.
I think I’ll keep using both. The basket is ideal for bulky or oddly shaped loads such as groceries, large boxes, and bicycle tires. The basket does not carry small items such as keys or even gloves very well because they can fall through the open bottom. The handlebar bag is much more useful for carrying gear, but not as useful for riding.
The ideal solution would be a basket which worked with the decaleur. This would make it easy to use the handlebar bag for touring and longer rides and switch to a basket for shopping or packages which are too large to fit into the handlebar bag. I may modify my Wald basket to work with this system.
How I tested and limitations in my testing
I’m writing this review in late June after having owned this bag for about two weeks. In that time I’ve used it for about 75 miles of commuting as my only on-bike storage and for about 150 miles of loaded touring while also carryingfour panniers.
While commuting I typically put stuff that I needed to reach (keys, my bus pass, maybe a book or MP3 player for the bus ride) in outside pockets and used the main pocket for a change of clothes, breakfast or lunch. I carried tools in the flat side pockets. While touring I used the rear pockets to hold my phone, camera, and wallet, the front pocket to hold my sunglasses, a side pocket for a rain cover, and the main pocket for food, a book, and a long sleeved shirt. I’ve ridden with the bag carrying loads of almost no weight up to about 6.5kg (15 pounds).
I did not encounter any rain during the review period, so I can’t comment on how this bag would fair in poor weather.I did make a simple raincover for it (and I understand that Velo Orange will offer one soon) in case of rain. I don’t think that the bag would hold up to heavy rain very well without a rain cover. The cotton duck doesn’t seem to be waxed, the cover does not protect the sides of the bag at all, and the map case is completely open on the sides.
Conclusion
The Ostrich F104, Velo Orange Decaleur, and a front rack of your choice provide a great way to carry a light to moderately heavy load up front. They provide an accessible load with plenty of capacity (both in weight and volume) which is easy to install and remove from the bike. I expect to use this system, or something very similar to it, for a long time to come.
The bag could use a few minor tweaks. The bottom strap is not well placed (at least for my Nitto front racks) and is thus useless. It would probably be nicer if the lid opened in the other direction, but this is not critical. The map case should not have any gridlines. It would be nice if bag was designed for greater weather resistance.All of these concerns are fairly minor and should not prevent one from buying it.
The decaleur does what it was intended to do extremely well. I’d like to see a built in method of locking the bag to the bike, but there are suitable workarounds and securing the bag this way is only necessary on the roughest roads.
There is not much competition out there for bags which use this mounting system or provide this capacity and the Ostrich bag and Velo Orange decaleur are both very well priced compared to what else is out there. If you are considering a front handlebar bag in this style it is hard to go wrong with this solution.
You can buy the decaleur today at Velo Orangeand they should be getting the bags in soon. I also have larger and more photosof this bag on the bike photo section of my website.
Tis a very nice bag. I make my own cycling bags and love to make them nearly as well as I love to use them. Sewing is my wintertime hobby.
Gus
Can the bottom of the bag be secured with a toe strap cinced around the outside rack rails?
Alex – How is the shifting with the cable housings routed under the Ostrich bag? Looks like a long curving run. I”d have the same issue and so am hesitant to get a big h”bar bag…